
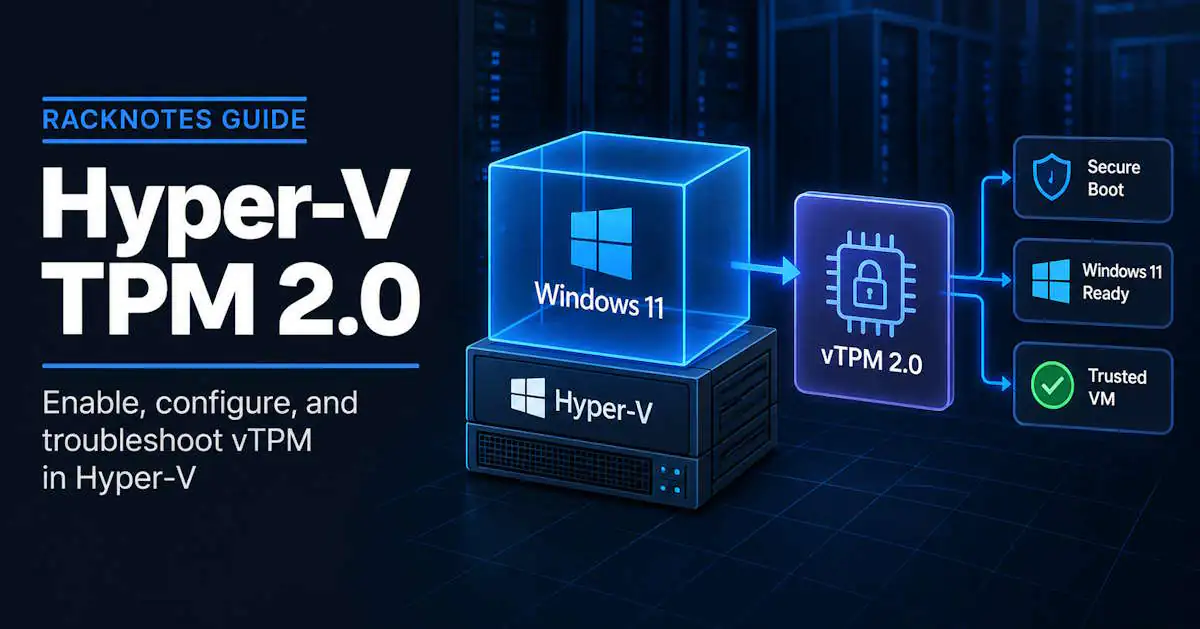
Hyper-V TPM 2.0 support comes from a virtual TPM (vTPM), not from the host’s physical chip. Microsoft’s Windows 11 requirements page says it directly: virtual TPM 2.0 is emulated in the guest VM independent of the Hyper-V host’s TPM presence or version. So a host without a TPM can still give a VM one, and a host with a TPM doesn’t hand it to the VM automatically.
What actually decides whether it works is the VM itself: it has to be Generation 2, it has to be off when you enable the vTPM, and it gets a key protector that ties its TPM state to the host’s certificates. That last part is the one that bites people later, usually the first time the VM moves to another host.
New Windows 11 VM: create it as Generation 2, then VM Settings > Security > Enable Trusted Platform Module, with the VM off.
Existing Generation 1 VM: no in-place fix. Build a new Generation 2 VM.
Moving a vTPM VM to another host: copy the host’s guardian certificates first, or the VM won’t start there.
- The vTPM is emulated per VM. It doesn’t need, use, or expose the host’s physical TPM.
- In PowerShell, enabling it takes two commands:
Set-VMKeyProtector -NewLocalKeyProtector, thenEnable-VMTPM. Hyper-V Manager does both for you. - The key protector is wrapped by certificates in the host’s
Shielded VM Local Certificatesstore. Lose those, and the VM’s TPM state, plus anything sealed to it, such as a BitLocker TPM protector, becomes unusable. - Windows 11 also needs Secure Boot, 4 GB of RAM, two virtual processors, and 64 GB of disk. A TPM alone won’t clear setup.
What Is Hyper-V TPM 2.0?
A Hyper-V vTPM is a software TPM 2.0 device that Hyper-V presents to a Generation 2 VM. The guest sees a normal TPM 2.0 in Device Manager and tpm.msc, and can use it for the same things a physical TPM does: BitLocker key sealing, Windows Hello, Credential Guard, measured boot, and passing the Windows 11 compatibility check.
Three facts shape everything else:
| Fact | Operational consequence |
|---|---|
| The vTPM is emulated per VM | The host’s physical TPM (or its absence) doesn’t matter for the guest |
| Its state is encrypted with a key protector | The VM’s TPM only works on hosts that hold the matching certificates |
| It’s tied to Generation 2 UEFI firmware | Generation 1 VMs can’t get one |
Why operators get this wrong: the obvious assumption is “my host has TPM 2.0, so the VM gets TPM 2.0.” It doesn’t work that way in either direction. A homelab host with TPM disabled in firmware can still run Windows 11 guests with vTPM, and a server with a perfectly healthy TPM still needs the setting enabled per VM.
Hyper-V’s vTPM is not the same thing as a full shielded VM. Shielded VMs and guarded fabric use the Host Guardian Service with attestation. A standard vTPM on a standalone host uses a local key protector instead, sometimes called the “untrusted guardian” mode. This article covers that standalone-host, local-key-protector model rather than a full guarded-fabric deployment.
Hyper-V TPM 2.0 Requirements
Before looking for the checkbox, confirm the VM and host can actually use it.
| Requirement | Detail |
|---|---|
| VM generation | Generation 2 only |
| VM state | Off when you enable or disable the vTPM |
| Host OS | Windows Server 2016 or later, or a supported Windows client edition with Hyper-V enabled |
| Host TPM | Not required for a standard vTPM |
| Key protector | Created automatically by Hyper-V Manager, or set with Set-VMKeyProtector in PowerShell |
Hardware, OS, and edition requirements for running Hyper-V itself are covered in the Hyper-V requirements guide. The table above only adds what vTPM needs on top.
Windows 11 VM requirements on Hyper-V
Microsoft lists separate virtual machine requirements for Windows 11. A vTPM is one item out of six:
| Setting | Windows 11 requirement |
|---|---|
| Generation | 2 (no in-place upgrade from Generation 1) |
| Security | Secure Boot capable, virtual TPM enabled |
| Memory | 4 GB or greater |
| Processors | Two or more virtual processors |
| Storage | 64 GB or greater |
| Host CPU | The host processor must meet the Windows 11 processor requirements |
That last row surprises people. Microsoft’s own page states the VM host processor must also meet Windows 11 processor requirements, so Hyper-V TPM 2.0 can’t make an unsupported host CPU look supported.
This article covers enabling and keeping a vTPM working. Secure Boot templates, Linux Secure Boot, and Secure Boot verification failures are a separate topic; here they’re mentioned only where Windows 11 setup needs them.
How to Enable TPM in Hyper-V Manager
This is the fastest route for a single VM, and it creates the key protector without any extra steps.
- Shut down the VM. The TPM option is unavailable while it’s running or saved.
- Right-click the VM in Hyper-V Manager and open Settings.
- Select Security.
- Make sure Enable Secure Boot is ticked, with the Microsoft Windows template for a Windows guest.
- Tick Enable Trusted Platform Module.
- Select Apply, then start the VM.
The Security page also offers Encrypt state and virtual machine migration traffic. That protects saved state and live migration traffic for the VM. It isn’t needed for Windows 11 setup, and enabling it changes nothing about the guest’s TPM.
If the checkbox isn’t there: the VM is almost certainly Generation 1. Generation 1 VMs show a different Security page without a TPM option. Check with Get-VM -Name win11 | Select-Object Name, Generation on the host. The only fix is a new Generation 2 VM, covered with the rest of the generation trade-offs in the Hyper-V VM configuration guide.
Enable TPM on a Hyper-V VM with PowerShell
PowerShell is the better route for templates, scripts, and Server Core hosts. Unlike the GUI, it doesn’t create the key protector for you, so there are two steps. Both commands come from Microsoft’s Set-VMKeyProtector and Enable-VMTPM references.
# HOST - read-only: confirm generation and state
Get-VM -Name win11 | Select-Object Name, Generation, State

# HOST - CHANGES STATE: VM must be Off
Stop-VM -Name win11

# HOST - CHANGES STATE: create a local key protector, then enable the vTPM
Set-VMKeyProtector -VMName win11 -NewLocalKeyProtector
Enable-VMTPM -VMName win11

# HOST - read-only: verify
Get-VMSecurity -VMName win11 | Select-Object TpmEnabled, Shielded, EncryptStateAndVmMigrationTraffic
TpmEnabled should read True. If Enable-VMTPM fails, first confirm that the VM has a key protector; if not, run Set-VMKeyProtector before enabling the vTPM.
- Don’t run
Set-VMKeyProtector -NewLocalKeyProtectoron a VM that already has a working vTPM unless you mean to replace it. - A new key protector means a new vTPM identity. Anything sealed to the old TPM, including BitLocker’s TPM protector, will no longer unseal.
- If the guest uses BitLocker, have the recovery key in hand before touching the key protector.
Get-VMKeyProtector -VMName win11retrieves the current key protector. Save it to a file before changing anything, with the command below.Set-VMKeyProtector -RestoreLastKnownGoodKeyProtectorcan restore Hyper-V’s last known good protector after a failed change.
# HOST - read-only: save the current key protector before changing it
Get-VMKeyProtector -VMName win11 | Out-File 'D:\Secure\win11-key-protector.kp'
Verify the TPM inside the guest
From an elevated PowerShell prompt in the guest:
# GUEST - read-only
Get-Tpm | Select-Object TpmPresent, TpmReady, TpmEnabled
TpmPresent and TpmReady should both be True. tpm.msc should show Specification Version: 2.0. If the guest sees no TPM while the host reports TpmEnabled : True, fully shut down and cold-start the VM, then re-check the VM generation and Security settings before changing the key protector.
Install Windows 11 on Hyper-V: VM Checklist
Most Windows 11 setup failures on Hyper-V aren’t TPM failures at all. Setup checks several things at once, and any one of them produces a “can’t run Windows 11” result.
Build the VM in this order:
- Generation 2. Chosen at creation, can’t be changed later.
- Memory: 4 GB or more. Installation and upgrade use the VM’s startup RAM, even with Dynamic Memory enabled. Set startup RAM to at least 4096 MB for the install.
- Two or more virtual processors. New VMs often default to one.
- 64 GB or larger virtual disk.
- Secure Boot on, with the Microsoft Windows template.
- vTPM on, with the VM off.
- Host CPU on Microsoft’s supported list. No VM setting changes this.
Hyper-V Manager’s Quick Create gallery is a shortcut for test VMs, but it doesn’t remove the need to check these values on the VM it builds.
# HOST - read-only: pre-install check
$vm = 'win11'
Get-VM $vm | Select-Object Name, Generation, ProcessorCount, MemoryStartup, DynamicMemoryEnabled
Get-VMFirmware $vm | Select-Object SecureBoot, SecureBootTemplate
Get-VMSecurity $vm | Select-Object TpmEnabled
Get-VMHardDiskDrive $vm | Get-VHD | Select-Object Path, @{n='SizeGB';e={$_.Size/1GB}}
Practical takeaway:
- A vTPM is necessary but not sufficient for Windows 11.
- Fix generation at creation time. Everything else can be changed with the VM off.
- If setup still refuses, read which requirement it names before changing anything.
How the Hyper-V Key Protector Works
This is the part tutorials skip, and the part that decides whether a Hyper-V TPM 2.0 VM survives a host rebuild.
When a vTPM is enabled on a standalone host, Hyper-V generates a local guardian, named UntrustedGuardian, backed by two self-signed certificates: a Shielded VM Encryption certificate and a Shielded VM Signing certificate. They live in the host’s local machine certificate store under Shielded VM Local Certificates. The VM’s key protector, which encrypts the vTPM’s state, is wrapped with those certificates.
The consequence chain:
- The vTPM’s contents are only readable on a host that has those certificates, with their private keys.
- The guest’s BitLocker TPM protector is sealed to that vTPM.
- Copy the VM files to a host without the certificates, and the VM won’t start. The guest data isn’t the problem; the key needed to open the vTPM is missing.
- Rebuild the original host without exporting the certificates first, and the same thing happens on the “same” host. A reinstalled Windows generates a new guardian.
Why this matters in practice: the certificates are part of the VM’s recovery path, just like the VHDX files. A backup that captures the VM but not the host’s guardian certificates can restore files that won’t boot. This is worth adding to the Hyper-V backup plan for any host running vTPM VMs.
# HOST - read-only: list the guardian and its certificates
Get-HgsGuardian
Get-ChildItem 'Cert:\LocalMachine\Shielded VM Local Certificates'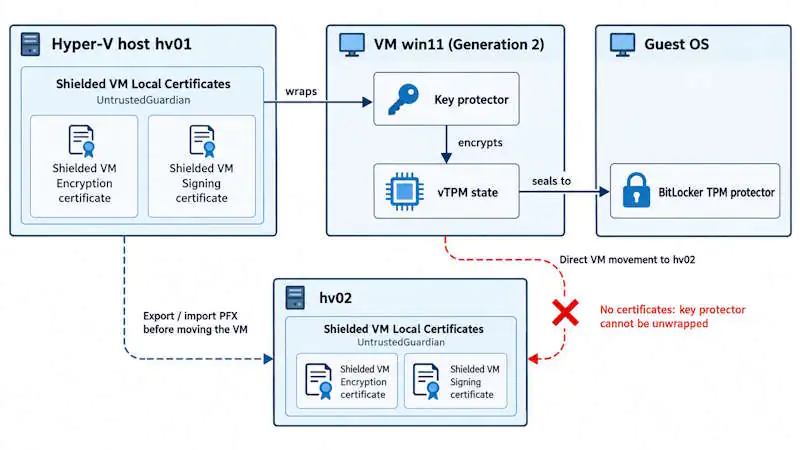
A predictable failure follows from this design: a host is reinstalled or replaced, the VM folders are restored from backup onto the new OS, and every Windows 11 VM refuses to start with a key protector error. The VHDX files are intact. What’s missing is the old host’s guardian certificates, which were never exported, and without them the vTPM state can’t be opened. If the original host is still bootable, or you have a backup that preserves the guardian certificates and their private keys, export and import them before replacing the protector. If that material is unavailable, plan for vTPM replacement and BitLocker recovery where it applies.
Move a vTPM VM to Another Hyper-V Host
To import and start an exported vTPM VM on another Hyper-V host, or to live migrate or fail it over there, the destination host must hold the source host’s guardian certificates and private keys. Microsoft’s ITOps Talk post Hyper-V Virtual TPMs, Certificates, VM Export and Migration walks through the same workflow; the short version is below.
On the source host (export):
# SOURCE HOST - CHANGES STATE: writes a PFX containing private keys
$pw = Read-Host -AsSecureString -Prompt 'PFX password'
Get-ChildItem 'Cert:\LocalMachine\Shielded VM Local Certificates' |
    Export-PfxCertificate -FilePath 'D:\Secure\hv01-guardian.pfx' -Password $pw -CryptoAlgorithmOption AES256_SHA256
On the destination host (import):
# DESTINATION HOST - CHANGES STATE: imports the source host's guardian certificates
$pw = Read-Host -AsSecureString -Prompt 'PFX password'
Import-PfxCertificate -FilePath 'D:\Secure\hv01-guardian.pfx' -CertStoreLocation 'Cert:\LocalMachine\Shielded VM Local Certificates' -Password $pw

# DESTINATION HOST - read-only: confirm both certificates arrived
Get-ChildItem 'Cert:\LocalMachine\Shielded VM Local Certificates' | Select-Object Subject, NotAfter
Treat the PFX like a master key. Whoever has it can open the vTPM of every VM protected by that guardian. Use a strong password, keep the file off general file shares, and store it with the same care as BitLocker recovery keys. Don’t put the password in the script.
For failover clusters, every node needs the guardian certificates of every node a vTPM VM might run on. Without that, live migration of vTPM VMs fails even though the cluster itself is healthy. That symptom tends to be misread as a migration network or authentication problem. Cluster-level design is in the Hyper-V failover clustering guide, and migration error diagnosis in Hyper-V live migration failed.
Rule of thumb: export guardian certificates on the day you enable the first vTPM on a host, not on the day you need them.
Hyper-V TPM 2.0 Troubleshooting
The order below reflects practical investigation priority: VM generation first, VM settings second, key protector and certificates last.
“This PC Can’t Run Windows 11” or “The PC Must Support TPM 2.0”
Setup’s compatibility check failed. TPM is only one of several possible reasons.
- Run the pre-install check from the checklist section on the host.
Generationmust be2. If it’s1, stop and build a new VM.TpmEnabledmust beTrue. If not, shut down the VM and enable it.SecureBootmust beOn.ProcessorCountmust be 2 or more, and startup memory 4096 MB or more. The virtual disk must be 64 GB or larger.- If all of the above pass, check the host CPU against Microsoft’s supported processor list.
Change one thing, then restart setup from the beginning. Setup reads the configuration at boot.
Enable Trusted Platform Module Is Missing or Greyed Out
- Option missing entirely: Generation 1 VM.
- Option visible but greyed out: the VM is running or in saved state. Shut it down cleanly from inside the guest.
- No Hyper-V at all on a Windows 11 Home host: Home editions don’t include Hyper-V.
“The Key Protector Could Not Be Unwrapped”
This error appears when the host can’t open the VM’s key protector. Hyper-V points to the HostGuardianService-Client event log for details, and the details decide the fix:
- VM recently moved, restored, or imported: the destination host is missing the source host’s guardian certificates. Import them as described above.
- Host OS reinstalled: the old guardian is gone unless its certificates and private keys were exported or are still recoverable from the original, bootable host or a backup that preserved them.
- New VM on a host that never had certificate problems: read the HostGuardianService-Client event. A Microsoft Q&A thread on Windows Server 2022/2025 documents this error alongside an event stating that Isolated User Mode couldn’t be detected; that case was resolved by a host firmware update and a host TPM clear, not by certificate work.
Don’t create a new key protector as a first response. It discards access to the old vTPM state, and with it any BitLocker TPM protector inside the guest.
BitLocker Recovery Screen After Moving or Rebuilding the VM
If the VM starts but the guest asks for a BitLocker recovery key, the vTPM the guest sees is not the one BitLocker sealed its key to. That happens after a new key protector, or after re-enabling the vTPM with a fresh identity. Enter the recovery key, then let BitLocker reseal to the current vTPM. Why the screen appears and what to have ready is covered in the BitLocker recovery screen guide.
Final Thoughts
Hyper-V TPM 2.0 is a two-minute setting with a long tail. Enabling the vTPM on a Generation 2 VM is trivial, and Windows 11 setup can still fail on memory, processors, Secure Boot, or other requirements even when the vTPM is configured correctly. The real operational cost is the key protector: the VM’s TPM state is now tied to certificates on the host, and those certificates have to travel with the VM.
For most homelab and SMB hosts, the practical default is simple. Enable vTPM on new Windows 11 VMs and on server VMs where the workload or security policy requires TPM-backed features, export the host’s guardian certificates once, and store them alongside your BitLocker recovery keys. Do that, and moving a VM is a routine task instead of a recovery exercise.
Frequently Asked Questions
Does Hyper-V TPM 2.0 need a physical TPM on the host?
No. Microsoft states that virtual TPM 2.0 is emulated in the guest independently of the host’s TPM presence or version. A host with no TPM can still give Windows 11 VMs a vTPM.
How do I enable TPM in Hyper-V?
Shut down the VM, open Settings > Security, and tick Enable Trusted Platform Module. In PowerShell, run Set-VMKeyProtector -VMName <name> -NewLocalKeyProtector and then Enable-VMTPM -VMName <name>. The VM must be Generation 2 and powered off.
Can I add TPM to a Generation 1 Hyper-V VM?
No. vTPM requires Generation 2, and Hyper-V doesn’t change a VM’s generation in place. Microsoft also states that an in-place upgrade of a Generation 1 VM to Windows 11 isn’t possible. Build a new Generation 2 VM and migrate the workload or data.
Why won’t my vTPM VM start on another host?
The destination host is missing the source host’s guardian certificates from the Shielded VM Local Certificates store. Export them as a PFX on the source host, import them on the destination, and try again. Replacing the key protector may let the VM use a new vTPM identity, but it discards access to the old vTPM state and can trigger BitLocker recovery. It shouldn’t be the first response to a migration or certificate problem.
Is a Hyper-V vTPM the same as a shielded VM?
No. A shielded VM uses the Host Guardian Service and host attestation to restrict which hosts can run it. A standard vTPM on a standalone host uses a local guardian and key protector. It protects TPM state at rest but doesn’t give you the fabric-level controls of guarded hosts.
Hyper-V Series
16 articles – Windows Server 2025 · Requirements · Licensing · Networking · Storage · USB Passthrough · TPM 2.0 · Backup · Clustering