
Install Hyper-V on Windows Server 2025 with one PowerShell command. Open an elevated session and run:
Install-WindowsFeature -Name Hyper-V -IncludeManagementTools -RestartBefore running the command, confirm that the processor supports SLAT and VM Monitor Mode extensions, and that hardware-assisted virtualization and hardware-enforced DEP are enabled in BIOS or UEFI. After the restart, verify with Get-WindowsFeature Hyper-V and confirm the host is operational with Get-VMHost. The same process applies to Windows Server 2022 and 2019.
- Scope: Windows Server 2025, 2022, and 2019
- Processor must support SLAT and VM Monitor Mode extensions; hardware virtualization and DEP must be enabled in BIOS or UEFI
- Run
Install-WindowsFeature -Name Hyper-V -IncludeManagementTools -Restartin an elevated PowerShell session - On Server Core, the same command installs the Hyper-V PowerShell module; manage the host remotely via Hyper-V Manager or PowerShell remoting
- Verify after restart:
Get-WindowsFeature Hyper-V,Get-VMHost,Get-VMSwitch,Get-Service vmms
Hyper-V Requirements for Windows Server 2025
Four hardware and firmware conditions must be met before the role can operate. All four are required:
- Hardware-assisted virtualization – Intel VT-x or AMD-V/SVM, enabled in BIOS or UEFI
- SLAT – Second Level Address Translation (Intel EPT or AMD RVI), a processor capability
- VM Monitor Mode extensions – required for hypervisor operation, a processor capability
- DEP – Data Execution Prevention (Intel XD or AMD NX), enabled in BIOS or UEFI
Most current x64 server processors support all four, but firmware settings and older hardware should still be verified before you install Hyper-V.
Check CPU and firmware requirements before you install Hyper-V
Run this in an elevated PowerShell session first:
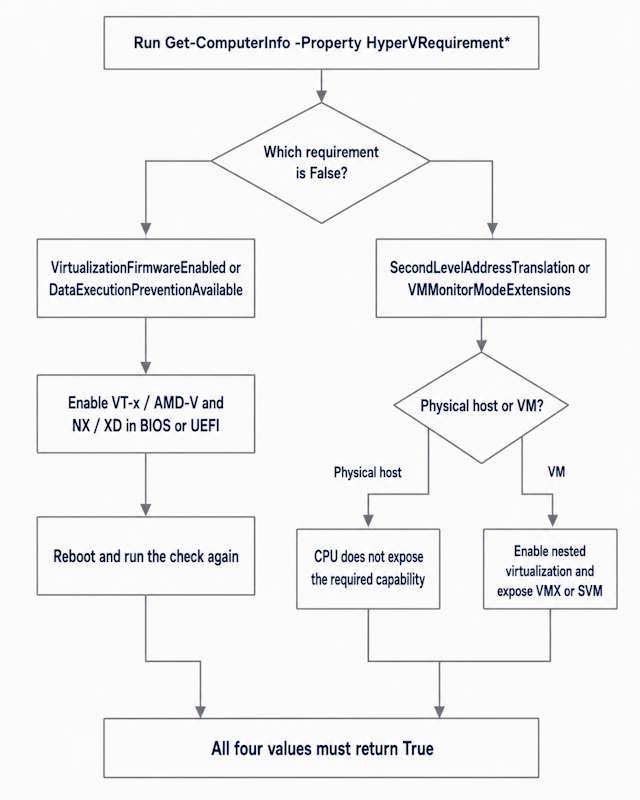
Get-ComputerInfo -Property HyperVRequirement*All four values should return True. What a False result means depends on which property returned it:
HyperVRequirementVirtualizationFirmwareEnabled: FalseorHyperVRequirementDataExecutionPreventionAvailable: False– these are firmware-controlled settings; enter BIOS or UEFI and enable hardware virtualization (VT-x or AMD-V/SVM) and the NX/XD bitHyperVRequirementSecondLevelAddressTranslation: FalseorHyperVRequirementVMMonitorModeExtensions: False– these are processor capabilities, not firmware toggles. BIOS cannot add a feature the CPU does not physically support. On a physical host, this typically means very old hardware. Inside a VM, it usually means nested virtualization is not enabled or the host is not exposing the required CPU features to the guest.
systeminfo from Command Prompt also shows Hyper-V Requirements at the bottom of its output. Microsoft’s Hyper-V hardware requirements documentation covers the full prerequisite matrix including minimum RAM and storage.
On Intel systems, look for Intel Virtualization Technology (VT-x) under CPU or Advanced settings in BIOS. On AMD systems, look for SVM Mode or AMD-V. The exact label varies by board vendor.
VT-d, IOMMU, and Discrete Device Assignment
VT-d or AMD IOMMU is not required for a standard Hyper-V installation. It becomes relevant only for advanced passthrough scenarios such as Discrete Device Assignment, which also requires compatible platform firmware, interrupt and DMA remapping, PCIe support, and a suitable device. Enable VT-d when your deployment specifically needs those scenarios; skip it otherwise.
If this server also runs third-party virtualization software, verify its current Hyper-V compatibility before enabling the role. When the Microsoft hypervisor is active, other virtualization products can use compatibility modes, lose features, or run more slowly. On a dedicated server host, this is rarely a factor.
How to Install Hyper-V with PowerShell
PowerShell is the faster path, and the same installation command works on Server with Desktop Experience and Server Core. For most deployments, this is the only command you need.
Local server
Install-WindowsFeature -Name Hyper-V -IncludeManagementTools -Restart-IncludeManagementTools adds Hyper-V Manager and the Hyper-V PowerShell module. Without it, the hypervisor installs but no management interface appears after the reboot. This flag gets omitted in a surprising amount of documentation – it is the first thing to check when Hyper-V Manager does not show up post-install.
-Restart reboots automatically when the feature installation completes. Remove it to control reboot timing manually, which is useful when you want to schedule the reboot or confirm the install log before rebooting.
Remote server
Install-WindowsFeature -ComputerName SERVER01 -Name Hyper-V -IncludeManagementTools -RestartReplace SERVER01 with the target hostname or FQDN. PSRemoting must be enabled on the target. Using an IP address instead of a hostname can require additional WinRM configuration – either HTTPS transport or adding the IP to the TrustedHosts list with explicit credentials.
Server Core
The command is identical on Server Core:
Install-WindowsFeature -Name Hyper-V -IncludeManagementTools -RestartOn Server Core, -IncludeManagementTools installs the Hyper-V PowerShell module. There is no local Hyper-V Manager GUI to install because there is no desktop environment. Manage a Server Core Hyper-V host remotely via Hyper-V Manager from a Windows admin workstation (Action -> Connect to Server), or through PowerShell remoting. Microsoft’s remote Hyper-V management documentation covers connection setup and authorization in detail.
One note on Hyper-V Server 2019: Microsoft released it for the last time in 2019 – there is no 2022 or 2025 version. For a dedicated virtualization host today, the path is Windows Server Core with the Hyper-V role: a minimal GUI-less deployment on the current release. Unlike the discontinued free Hyper-V Server product, Windows Server Core requires appropriate Windows Server licensing. For a full overview of how the hypervisor works before committing to deployment, see What Is Hyper-V?
How to Install Hyper-V with Server Manager
Open Server Manager. Dashboard -> Manage -> Add Roles and Features.
- Before You Begin – Next
- Installation Type – Role-based or feature-based installation – Next
- Server Selection – confirm your local server – Next
- Server Roles – check Hyper-V, accept the prompt to add required features – Next
- Features – leave defaults – Next
- Hyper-V – overview page – Next
- Virtual Switches – decision point; see the next section before clicking
- Virtual Machine Migration – leave defaults for a standalone host
- Default Stores – set default paths for VM config files and VHDs. If a dedicated storage volume exists, point the stores there now; moving VMs to a different path after they exist requires more steps than configuring the path upfront.
- Confirm – check “Restart the destination server automatically if required” – Install
Should You Create the Virtual Switch During Setup?
The wizard offers to create an External virtual switch as part of installation. Whether to do it here or after the role installs depends on how the host is networked.
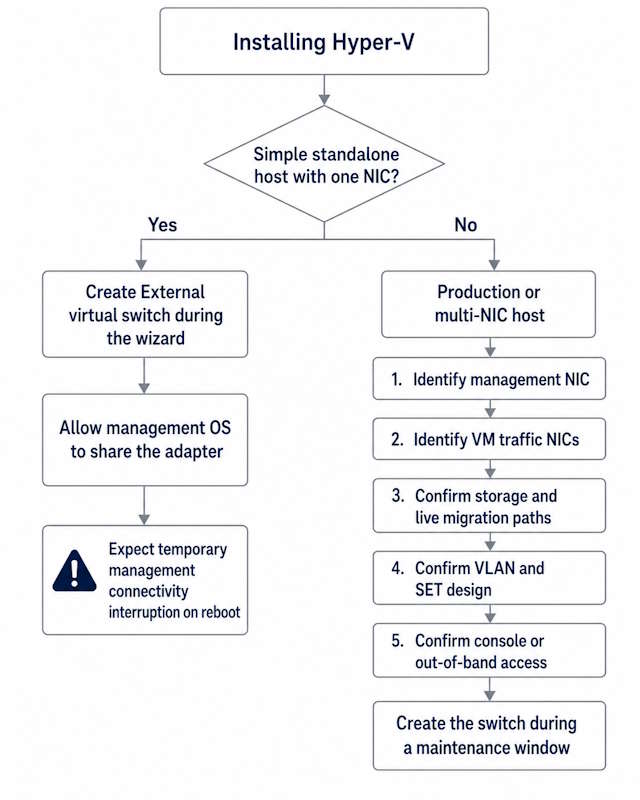
For a simple standalone host with a single NIC: create the External switch during the wizard. An External switch bridges VMs to the physical network through the host NIC, and on a single-NIC host the choice is straightforward.
For a production or multi-NIC host: install Hyper-V first, then create the switch during a planned maintenance window after the network design is confirmed. Before binding a NIC, clarify which adapter carries management traffic, which carries VM traffic, whether storage replication and live migration use dedicated paths, and how VLAN tagging is configured. Creating the switch in the wizard before that design is set can bind the wrong adapter or leave the management network on an unintended interface.
Creating or rebinding an external virtual switch temporarily interrupts remote management connectivity on the host. Confirm console or out-of-band access before creating the switch remotely.
For virtual switch types, SET teaming, and VLAN design, see the Hyper-V Networking guide.
Internal switch connects VMs to each other and to the host, but not to the physical network – useful for isolated lab segments. Private switch connects VMs to each other only, with no host access. For production hosts, External is the standard starting point.
Verify Hyper-V After the Restart
A clean reboot after you install Hyper-V is not the same as a working installation. Run these four checks before creating any VMs.
# Confirm the role installed
Get-WindowsFeature Hyper-V

# Confirm the hypervisor is operational
Get-VMHost

# Confirm virtual switch state
Get-VMSwitch

# Confirm the VM management service
Get-Service vmms
Get-WindowsFeature Hyper-V should show InstallState: Installed. If it shows Available, the role did not install – check the Server Manager event log for the specific error before trying anything else.
Get-VMHost returns Hyper-V host configuration: default VM and virtual disk paths, migration settings, NUMA configuration, and other host-level properties. If it fails, first verify that the Hyper-V PowerShell module is installed, the vmms service is running, and the session has sufficient permissions before treating the result as a hypervisor problem. A quick module check: Get-Module -ListAvailable Hyper-V.
Get-VMSwitch lists virtual switches on the host. If you intentionally skipped switch creation during the wizard, the command returns no objects – that is not an installation failure, it only means no switch exists yet. For a simple single-NIC host where the management OS must continue using the same adapter, create the switch with:
New-VMSwitch -Name "External Switch" -NetAdapterName "Ethernet" -AllowManagementOS $trueReplace "Ethernet" with the actual adapter name from Get-NetAdapter. On a multi-NIC or production host, confirm the management, VM, storage, VLAN, and SET design before running this command – -AllowManagementOS $true means the management OS will share this adapter with the virtual switch, which may not be the right configuration for every host.
Get-Service vmms should show Running. If the Virtual Machine Management Service is stopped, run Start-Service vmms.
If Hyper-V Manager does not appear after the install, or the Hyper-V PowerShell module is missing, reinstall the management tools:
Install-WindowsFeature -Name RSAT-Hyper-V-Tools -IncludeAllSubFeatureCommon Hyper-V Installation Errors
- If running inside a VM: the physical host is not exposing nested virtualization to this guest
- On a Hyper-V host – shut down the VM and run:
Set-VMProcessor -VMName "YourVM" -ExposeVirtualizationExtensions $true - On Proxmox VE – nested virtualization must be enabled on the physical host and the VM must expose Intel VMX or AMD SVM flags to the guest; setting the guest CPU type to
hostis typically part of the configuration but is not sufficient on its own - On a physical host – run
Get-ComputerInfo -Property HyperVRequirement*and check which value is False; SLAT or VM Monitor Mode returning False indicates a processor limitation, not a firmware setting that can be toggled
- Run
Get-ComputerInfo -Property HyperVRequirement*– if virtualization firmware or DEP shows False, re-enter BIOS or UEFI and enable the settings, then reboot - Check the hypervisor boot entry:
bcdedit /enum | findstr hypervisorlaunchtype– should returnAuto - If it returns
Off, runbcdedit /set hypervisorlaunchtype autoand reboot - If a third-party hypervisor was recently disabled or uninstalled, verify it did not leave a modified boot configuration entry
- Confirm the account is elevated or belongs to the local Administrators or Hyper-V Administrators group on the host
- Check the VM management service:
Get-Service vmms– if stopped, runStart-Service vmms - If the service fails to start, check event log: Applications and Services Logs – Microsoft – Windows – Hyper-V-VMMS – Admin
- For remote connections, verify WinRM is enabled on the target, firewall rules allow the management port, and name resolution works from the management workstation to the host
What to Do After Installing Hyper-V
With the role verified and the host operational, the next decisions involve VM configuration defaults, storage layout, backup policy, and security hardening. In production environments, the host is typically managed remotely from the start – that is the standard model for Server Core and common even on Desktop Experience deployments. Add the host to Hyper-V Manager on the admin workstation now: Action -> Connect to Server.
The full pre-production task list is in the Hyper-V Post-Install Checklist. If a VM fails to start after you install Hyper-V and set up your first guests, Hyper-V VM Won’t Start covers the full diagnostic sequence for every common failure mode.
FAQ
Can I install Hyper-V on Windows Server 2025 with PowerShell?
Yes. Run Install-WindowsFeature -Name Hyper-V -IncludeManagementTools -Restart in an elevated session. After the restart, verify with Get-WindowsFeature Hyper-V and confirm the host with Get-VMHost.
Does this process also work on Windows Server 2022 and 2019?
Yes. The Hyper-V installation process and the core PowerShell command are the same on Windows Server 2025, 2022, and 2019. The verification commands are identical across all three releases.
Do I need to enable virtualization in BIOS before installing Hyper-V?
Yes, for the firmware-controlled requirements: hardware-assisted virtualization (VT-x or AMD-V/SVM) and DEP must be enabled in BIOS or UEFI. SLAT and VM Monitor Mode extensions are processor capabilities – they cannot be toggled in firmware, but must be present in the CPU and exposed to the guest if Hyper-V is running inside a VM. Microsoft’s install Hyper-V documentation lists all four requirements and their behavior on Server editions.
Should I create an external virtual switch during the installation wizard?
For a simple standalone host with a single NIC, yes. For a production or multi-NIC host, install the role first and create the switch after confirming which NIC carries management traffic, which carries VM traffic, and how VLAN tagging applies. Creating it in the wizard before that design is set can bind the wrong adapter or disrupt management connectivity during installation.
How do I verify that Hyper-V installed correctly?
Run Get-WindowsFeature Hyper-V (role should show Installed), Get-VMHost (should return host configuration data), Get-VMSwitch (lists switches – empty is not an error if you skipped switch creation), and Get-Service vmms (Virtual Machine Management Service should be Running).
Bottom Line
Installing the Hyper-V role itself rarely causes problems. What operators lose time on is installing without verifying BIOS prerequisites first, creating an external switch before the network design is confirmed, and treating a clean reboot as proof that the host is working before running the verification commands.
The installation process is the same on Windows Server 2025, 2022, and 2019. Get the prerequisites right, verify after the restart, and the rest of the work moves to post-install configuration where it belongs.
Hyper-V Series
14 articles – Windows Server 2025 · Requirements · Licensing · Networking · Storage · Backup · Clustering