
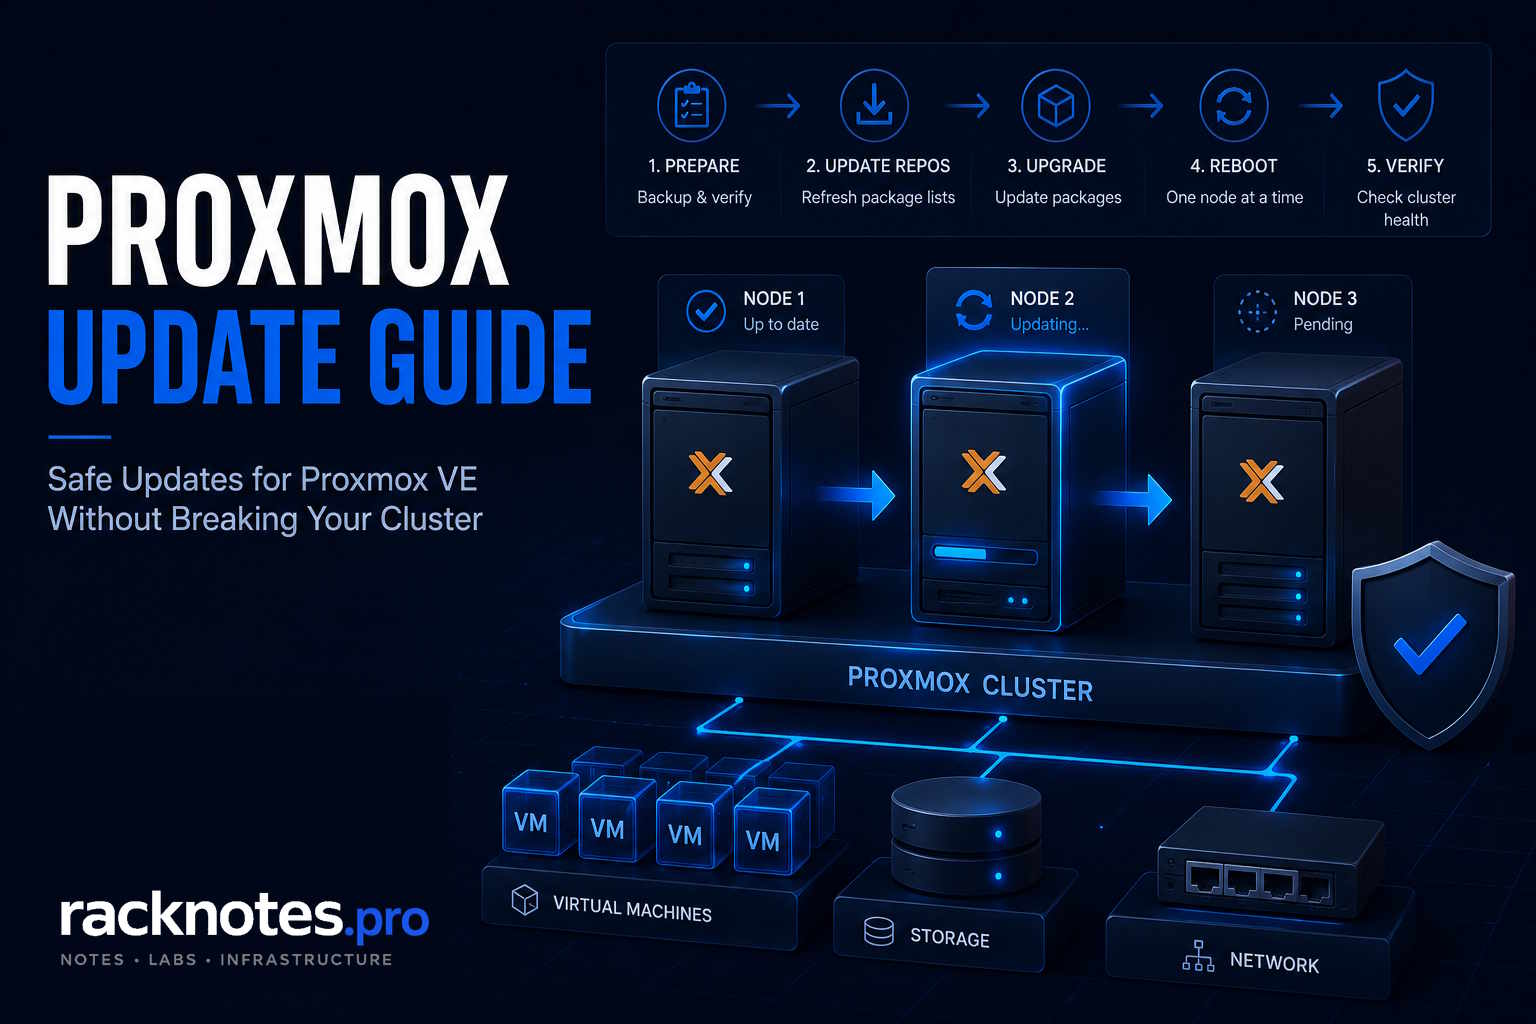
For a routine Proxmox update within the same Proxmox VE major release, verify repositories and backups, run apt-get update, stop on any repository error, simulate the dependency-resolving upgrade, review removals, run the update, reboot when required, and validate the host before returning workloads. Use the GUI under Node > Updates or the equivalent CLI sequence.
A PVE 8-to-9 upgrade is a different, dedicated procedure – not a routine update. Fully update PVE 8.4 first, run pve8to9 --full, resolve every relevant warning, and follow the official upgrade guide before changing Bookworm repository suites to Trixie.
Reviewed July 2026. Proxmox VE 9.2 (released May 21, 2026, Debian 13.5 “Trixie” base, kernel 7.0 as the stable default) is the current release line. Proxmox VE 8.4 receives security updates and critical bug fixes until August 2026 – still supported on the date of this review, but the transition window is short, and PVE 8 operators should already be scheduling the documented upgrade to PVE 9. Verify the current release and lifecycle status against the Proxmox roadmap before relying on these dates in the future. This guide covers routine package updates within either release line; the PVE 8-to-9 transition itself is a distinct process covered only at a summary level below – see the official 8-to-9 upgrade guide for the full procedure.
- Decide first: routine update within a release, or a major PVE 8-to-9 upgrade – they are not the same procedure.
- Verify repositories before touching anything, refresh package indexes with
apt-get updatefirst, then simulate before applying. - Back up more than
/etc/pve: node network config, apt sources, bootloader config – and confirm current VM/CT backups separately. - A kernel package installing successfully doesn’t mean it’s active – verify before assuming the reboot happened for nothing.
- Update cluster nodes one at a time, using HA node maintenance mode, not cluster-wide HA disarm.
- Keep a known-good kernel available for rollback – kernel rollback doesn’t undo userspace or configuration changes.
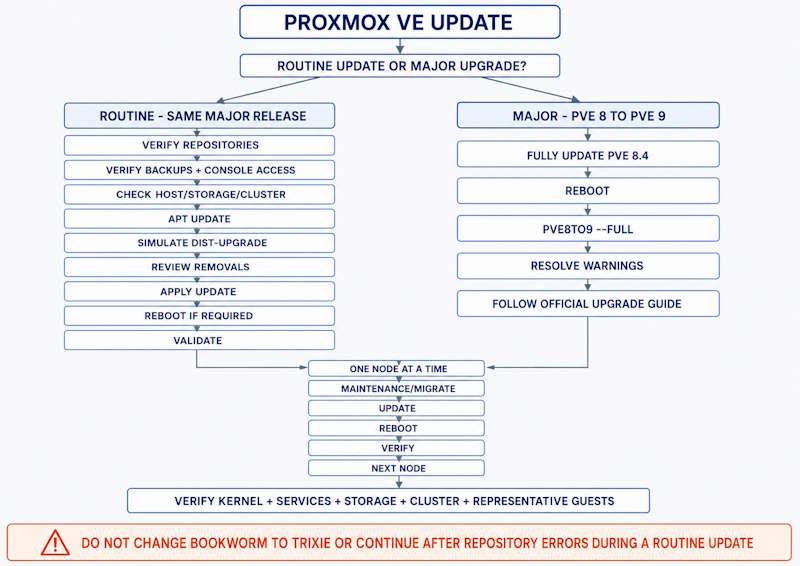
Routine Proxmox Update or Major Upgrade? Decide This First
A routine update – installing new packages within the same release, PVE 8.x staying on 8.x or PVE 9.x staying on 9.x – is a different operation from a major upgrade, moving a PVE 8.4 host to PVE 9. Treating them as the same procedure is where a generic guide can get someone into trouble. Fully update the current release first, then run the official pre-flight checker:
# Still on PVE 8.4 / Bookworm
apt-get update
apt-get dist-upgrade
reboot

# Only after the current PVE 8.4 update is confirmed complete
pveversion -v
pve8to9 --full
Run pve8to9 --full, resolve every FAIL, investigate and document each WARN, review the informational checks, then rerun the checker before changing any repository suite. Ceph users must complete the required Ceph upgrade path first. This guide covers the routine update workflow that applies before and after that transition, not the transition itself – see the official 8-to-9 upgrade guide for the complete sequence, including Ceph’s own upgrade path and the current PVE roadmap.
When to Postpone a Proxmox Update
Not every window is the right window. Postpone when: the host is already unstable (random crashes, ZFS errors, unexplained VM failures – diagnose the existing problem first, don’t add a variable on top of it); no console access is available and the update includes a kernel or other reboot-relevant package; a backup, migration, scrub, resilver, or Ceph recovery operation is currently active; or a major configuration change (new GPU passthrough, storage reconfiguration) happened recently and the host hasn’t run stable on it yet.
Choose your update cadence from security exposure, release notes, hardware sensitivity, test coverage, maintenance capacity, and workload criticality – not a fixed calendar rule. Apply urgent security fixes according to actual risk; don’t let a quarterly-only policy override an active vulnerability. Weekly, monthly, and quarterly patterns are common field practices, not evidence-based universal risk tiers.
A separate question is when in the day: kernel updates require a reboot, and the reboot is where things actually fail. Reserve a planned window with console access available – weekday evenings or weekend mornings are common choices – rather than rebooting a production host mid-workday. Updating a host with no out-of-band access (no IPMI, no IP KVM, no physical access – common on consumer mini PCs used as homelab hosts) is a different risk category: if the reboot fails, recovery means physically reaching the hardware. Don’t split the update into arbitrary partial package batches to reduce that risk – a partial dependency state is not safer than a complete one. If console access genuinely isn’t available, defer the complete update and reboot until it is. See the mini PC for Proxmox guide for the hardware constraints driving this, and the post-install checklist for the hardening that should already be in place before any update cycle.
Pre-Update Evidence and Verified Backups for a Proxmox Update
Verify repository configuration – don’t assume filenames. Repository definitions vary by install age and format – classic .list files, the newer deb822 .sources format, and Ceph’s own separate definition if installed. Inspect what’s actually active instead of checking two hardcoded filenames:
grep -RhsE '^[[:space:]]*(deb |Types:|URIs:|Suites:|Components:)' \
  /etc/apt/sources.list \
  /etc/apt/sources.list.d/ 2>/dev/null

apt-cache policy
apt-cache policy proxmox-ve
The Proxmox GUI also shows this under Node > Updates > Repositories – often the faster check. PVE 8 repositories should stay on Bookworm, PVE 9 repositories should stay on Trixie, and Debian/Proxmox/Ceph repositories must all be compatible with each other – don’t mix major-release suites or carry stale duplicate definitions. The proxmox-ve metapackage should remain installed with the expected repository candidate. The enterprise repository is the recommended production channel and requires a valid subscription; the no-subscription repository is publicly available, updated more frequently, and not validated to the same level – use one deliberate channel consistently rather than mixing them casually. For a clean starting point, see the Proxmox installation guide.
Back up more than /etc/pve. /etc/pve is the pmxcfs view containing cluster, VM/CT, storage, HA, firewall, and authentication configuration – it does not contain the node’s traditional network configuration, which lives separately under /etc/network and related local files and must be captured on its own. Verify the backup target is actually a mount point and writable before writing to it, or the archive can silently land on the node’s own root filesystem instead. Some paths below are bootloader- or install-specific and may not exist on every host – capture them conditionally rather than letting a missing file abort the whole archive:
STAMP="$(date +%F-%H%M)"
BACKUP_TARGET='/mnt/external-backup'
EVIDENCE_DIR="/root/pre-update-$STAMP"

mountpoint -q "$BACKUP_TARGET" || { echo "Backup target is not a mount point - stopping"; exit 1; }
test -w "$BACKUP_TARGET" || { echo "Backup target is not writable - stopping"; exit 1; }

mkdir -p "$EVIDENCE_DIR"
pveversion -v > "$EVIDENCE_DIR/pveversion.txt"
pvereport > "$EVIDENCE_DIR/pvereport.txt"

cp -a /etc/network "$EVIDENCE_DIR/"
cp -a /etc/apt "$EVIDENCE_DIR/"

for path in /etc/hosts /etc/hostname /etc/resolv.conf \
            /etc/kernel/cmdline /etc/default/grub \
            /etc/modprobe.d /etc/modules /etc/modules-load.d /etc/udev/rules.d
do
  [ -e "$path" ] && cp -a --parents "$path" "$EVIDENCE_DIR/"
done

tar -C / -czf "$BACKUP_TARGET/etc-pve-$STAMP.tar.gz" etc/pve
tar -C /root -czf "$BACKUP_TARGET/pre-update-evidence-$STAMP.tar.gz" "pre-update-$STAMP"

sha256sum "$BACKUP_TARGET/etc-pve-$STAMP.tar.gz" \
          "$BACKUP_TARGET/pre-update-evidence-$STAMP.tar.gz" \
          > "$BACKUP_TARGET/pre-update-$STAMP.sha256"
Verify the archive actually landed and is readable before trusting it:
ls -lh "$BACKUP_TARGET"/*"$STAMP"*
tar -tzf "$BACKUP_TARGET/etc-pve-$STAMP.tar.gz" | head
tar -tzf "$BACKUP_TARGET/pre-update-evidence-$STAMP.tar.gz" | headpvereport, host files, repository definitions, addresses, and cluster configuration can expose sensitive operational details – review contents before copying this evidence outside your administrative security boundary. The tar itself takes seconds; rebuilding lost cluster config from memory usually burns an entire evening. Take the /etc/pve copy while the cluster filesystem is healthy and quorate, and keep the whole evidence bundle off the node – it’s a rebuild reference, not something you restore onto a live cluster later (more on that below). Most importantly: verify current VM/CT backups are actually up to date. A configuration archive is not a workload backup.
Check storage, cluster, and package health. Do this before contacting any repository:
pveversion -v
pvesm status
apt-mark showhold
dpkg --audit
uname -r
df -h /
df -h /boot 2>/dev/null
df -h /boot/efi 2>/dev/null
proxmox-boot-tool status

# Clustered / ZFS / Ceph as applicable
pvecm status
pvecm nodes
ha-manager status
zpool status
ceph -s
Confirm there’s no active backup, migration, scrub, resilver, or recovery operation running, storage shows healthy, and quorum is intact. If apt-mark showhold shows held packages, find out why before assuming they can be unheld – a hold is sometimes deliberately masking a real conflict.
Repository Refresh and Simulation
Refresh package indexes before simulating anything – simulating against stale indexes can miss what’s actually about to change:
apt-get updateStop and fix it if an expected Debian, Proxmox, or Ceph repository errors here (“Could not resolve” or “Hash mismatch”) – continuing can produce an unintended package set built only from whatever repositories remained reachable. Only after a clean refresh, simulate:
apt-get -s dist-upgradeThis simulation syntax is consistent across both PVE 8/Bookworm and PVE 9/Trixie; apt -s full-upgrade is an equivalent modern alternative on systems where it’s available, but don’t rely on apt-get -s full-upgrade specifically – that flag combination isn’t part of the Debian 12 apt-get command set used on PVE 8. Review the simulated output for package removals, new packages, held packages, kernel packages, bootloader/initramfs hooks, Ceph packages, and third-party DKMS packages. Stop and investigate rather than proceeding if the simulation proposes removing proxmox-ve or another core metapackage, or shows an unexpectedly large dependency change.
Run the Update: GUI or CLI
GUI: select the node, open Updates, click Refresh, resolve any repository errors, review the available package list, click Upgrade to open the update console, review every prompt and proposed removal, and validate completion before rebooting.
CLI:
apt-get update
apt-get dist-upgrade
dist-upgrade has the dependency-removal semantics a complete system update needs, and matches what current Proxmox documentation commonly shows for this workflow. Use this one command family consistently – don’t mix it with apt full-upgrade or plain apt upgrade, which can leave real updates “kept back” on a system with custom or held packages. Don’t add -y as a default habit – you want to actually see removals, configuration-file prompts, bootloader warnings, DKMS failures, and service-restart notifications as they happen, not scroll past them.
If package configuration fails partway through: preserve /var/log/apt/history.log and /var/log/apt/term.log, capture the exact dpkg error, check dpkg --audit, and don’t reboot until the kernel/initramfs/bootloader state is actually understood. Only once you’ve identified the failure do recovery commands make sense – they’re targeted recovery tools, not a routine first step:
dpkg --configure -a
apt -f install
The Proxmox Update Reboot Decision
This is the part where most updates that fail actually fail. A new kernel changes how the host talks to hardware – network drivers, storage drivers, GPU passthrough drivers all need to load correctly under it. Most of the time this is invisible; occasionally a driver regression breaks something specific to the host.
The safe pattern: schedule the reboot for a planned window with console access available, stop or migrate critical VMs first, verify uname -r shows the new kernel after boot, and test basic functionality (web UI, VM start, guest networking) before considering the update complete.
A kernel package installing successfully and it actually being active are two different things – the host keeps running the old kernel until you reboot, and the new kernel’s fixes aren’t live even though apt reported success. Live kernel patching isn’t the standard Proxmox workflow. Other low-level updates – systemd, libc, CPU microcode, bootloader, or storage-stack changes – can also justify or require a controlled reboot; don’t decide purely from whether a kernel package specifically appeared in the list. Check what’s actually pending instead of guessing from one signal:
uname -r
proxmox-boot-tool kernel list
dpkg -l 'proxmox-kernel-*' 'pve-kernel-*' 2>/dev/null
proxmox-boot-tool status
test -e /run/reboot-required && cat /run/reboot-required
proxmox-boot-tool kernel list shows kernels selected for boot synchronization, not a complete installed-package inventory – pair it with the dpkg -l check above. /run/reboot-required is a useful signal when present, but doesn’t exist on every Proxmox install; comparing the running kernel against what’s actually installed and pinned is the more reliable check either way. Proxmox normally retains multiple recent kernels through its boot-tool and cleanup logic, but verify a known-good one is actually present and selectable before rebooting a high-risk host – don’t assume it.
| Situation | Recommended action |
|---|---|
| New kernel installed | Schedule reboot to activate it |
| Security-critical low-level update | Reboot in the next approved maintenance window |
| Cluster node during business hours | Migrate/maintain and reboot later |
| GPU or PCI passthrough host | Reboot only with console access and rollback kernel verified |
| Ceph/ZFS/bootloader package changes | Review package-specific guidance and schedule controlled validation |
| Lab/test node | Reboot promptly when it can be used as the validation target |
Kernel Rollback
The kernel rollback path is the most common recovery scenario, and doesn’t depend on which bootloader the host uses:
proxmox-boot-tool kernel list
proxmox-boot-tool kernel pin <KNOWN-GOOD-KERNEL> --next-boot
reboot
--next-boot applies for one boot without permanently changing the default, so a bad guess doesn’t lock you onto the wrong kernel. After a successful diagnostic boot, make it persistent if needed:
proxmox-boot-tool kernel pin <KNOWN-GOOD-KERNEL>
proxmox-boot-tool kernel unpin
Unpin once the fixed kernel is validated. If the host uses classic GRUB and you want the boot menu visible without a key-press, edit /etc/default/grub and set these values (they’re file settings, not commands to run directly):
GRUB_TIMEOUT=5
GRUB_TIMEOUT_STYLE=menu
Then run update-grub – only relevant for hosts actually using GRUB; confirm the active bootloader with proxmox-boot-tool status first, since systemd-boot and Secure Boot-related paths don’t use this file the same way.
A kernel rollback only selects an older kernel to boot from – it doesn’t roll back QEMU, LXC userspace, ZFS utilities, Ceph packages, libc/systemd, or any configuration changes made alongside the update. For full host rollback, there’s no built-in Proxmox path; the closest options are booting the known-good kernel and repairing the interrupted state, restoring networking/storage from captured configuration, reinstalling the same supported release and restoring VMs/CTs from verified vzdump or PBS backups, or – only when backups are unavailable and the storage relationships are understood – reattaching existing guest disks. Restoring an old /etc/pve tree or cluster database onto a live, already-running cluster is not a routine step; it can reintroduce stale membership, duplicate guest ownership, old storage definitions, or authentication/certificate mismatches. Keep that archive for disaster recovery and deliberate node rebuilds, not as a quick fix for a currently misbehaving cluster.
Rolling Cluster Proxmox Updates
The single biggest cause of cluster outages from a Proxmox update is updating all nodes simultaneously, or continuing to the next node while the last one is still unhealthy or unverified. A rolling update inherently creates a brief window of mixed package versions across nodes – that’s expected and part of the supported process, not a defect. The dangerous state is continuing while a node is actually unhealthy, skipping the documented order, or leaving the cluster in an untested mixed state for an extended period.
Production environments running an HA cluster can reboot more frequently than a standalone host by using live migration to keep VMs running during each node’s window. Sequence: confirm quorum, node membership, HA status, shared/local storage and replication, and Ceph health where applicable; confirm the remaining nodes actually have capacity – RAM, CPU, storage, local-disk dependencies, passthrough devices, migration-compatible CPU settings – for whatever gets evacuated; place the node into maintenance and migrate workloads off it; run the repository refresh and simulation; update; reboot if required; confirm membership, storage, networking, HA, and representative workloads; remove maintenance mode; only continue to the next node once this one is fully healthy.
pvecm status
pvecm nodes
pvesm status
ha-manager status
ceph -s        # Ceph clusters
pvesr status   # replication where used
Don’t read pvecm status as simply showing every node as “OK” – check membership, quorum, and per-node detail explicitly. If a node fails to rejoin, fix that before touching the next one.
For a two-node cluster, three voting nodes remain the simplest reliable quorum design. A two-node cluster can use an external QDevice for quorum assistance, but that doesn’t create a third compute node or extra capacity to evacuate workloads onto – confirm quorum behavior and that the surviving node can actually run everything that must stay available before updating either node. For quorum failure and recovery specifically, see the cluster quorum guide.
HA Node Maintenance vs. HA Disarm
For patching a single node, use per-node HA maintenance mode – not cluster-wide HA disarm:
# Enable before updating this node
ha-manager crm-command node-maintenance enable <NODENAME>

# Disable after validation
ha-manager crm-command node-maintenance disable <NODENAME>
Enabling node maintenance asks the HA manager to move HA-managed services away from the node where possible – it doesn’t create capacity, make local storage migratable, or automatically solve passthrough and CPU-compatibility constraints. Non-HA guests still need a manual migrate, shutdown, or documented remain-on-node decision; maintenance mode doesn’t touch them. Before enabling it, verify destination capacity, shared/replicated storage, local-disk dependencies, PCI/GPU passthrough, CPU compatibility, migration bandwidth, HA group constraints, and guest locks or active jobs. After enabling it, confirm the intended guests actually left or stopped before proceeding:
ha-manager status
qm list
pct list
Cluster-wide commands like disarm-ha freeze, disarm-ha ignore, or arm-ha suppress or freeze HA fencing/communication behavior across the entire cluster – they exist for special cluster-wide maintenance scenarios, not as the default sequence for patching one node. Check the current official HA documentation before using cluster-wide disarm; the correct setting depends on cluster design and workload policy, not a one-size-fits-all toggle.
HA node maintenance is not Ceph maintenance. It controls HA-managed VM/CT services only – it doesn’t manage Ceph OSD rebalancing, recovery flags, monitor quorum, or maintenance safety. When the node also hosts Ceph services, follow the current Proxmox/Ceph node-maintenance procedure separately and verify the cluster stays within its failure tolerance. Whether to set and later clear Ceph maintenance flags depends on maintenance duration, how many OSDs are affected, current health, pool size/min_size, available replicas, and any other planned node outages – there’s no single command that’s correct for every cluster, so follow the current official Ceph maintenance documentation for your specific design rather than a generic toggle.
What Actually Breaks During a Proxmox Update
Most Proxmox update problems fall into a handful of recognizable patterns – for anything that starts with a log error, the Proxmox logs guide covers where to look first.
Networking doesn’t come back after reboot. Rarely a package silently rewriting /etc/network/interfaces – more often a new kernel or driver changes interface naming, driver behavior, bonding, VLAN handling, or bridge timing enough that the existing config no longer applies cleanly. Save a network-state baseline before updating so you have something to diff against – these commands capture state, they don’t create a rollback snapshot:
cp -a /etc/network/interfaces /root/interfaces.before-update
ip -br link > /root/ip-link.before-update
ip -br addr > /root/ip-address.before-update
See the networking setup guide if console recovery becomes necessary. On PVE 9, pve-network-interface-pinning can help pin interfaces to stable nicX names during the 8-to-9 transition specifically – that belongs to the major-upgrade process, not this routine sequence.
A new kernel changes hardware support. A driver regression, changed device support, or genuinely unsupported hardware can all look identical from the outside. Verify the actual PCI device, loaded driver, firmware, and kernel log before concluding support was removed – don’t assume it. Recovery: boot the known-good kernel and pin it while sourcing a workaround or replacement hardware. If the host won’t come back at all, the random crashes diagnostic guide covers the post-reboot investigation workflow.
ZFS pool doesn’t import. On a properly completed update, kernel and ZFS module packages ship as a coordinated stack – a mismatch here is more often a sign of something else: an incomplete update, a mixed repository state, custom kernels or DKMS modules, bootloader sync that didn’t run, or the host booting a kernel you didn’t expect.
uname -r
modinfo zfs | head
zpool status
journalctl -b -k
proxmox-boot-tool status
For deeper failures, the ZFS recovery guide covers pool import specifically.
Cluster node won’t rejoin. Don’t default to “version drift is the cause” – Corosync network reachability, name/address changes, firewall rules, time sync problems, configuration mismatch, or genuinely unsupported prolonged version drift can all produce this. Read the actual logs before assigning the cause:
pvecm status
pvecm nodes
systemctl status corosync pve-cluster
journalctl -u corosync -b --no-pager
journalctl -u pve-cluster -b --no-pager
Repository configuration errors. Mixing repository suites, using the wrong Ceph release for the installed version, or carrying stale/duplicate definitions makes apt fail in confusing ways that don’t clearly point at the actual problem – check apt-get update output carefully before running any upgrade.
Hash mismatch on apt-get update. Don’t keep re-running the upgrade past this. Retry after confirming time sync, DNS, proxy/cache behavior, the repository URL, and mirror state – persistent hash errors need diagnosis, not repetition.
Kept-back packages after simulation. Check what’s actually holding things back before assuming it’s a generic conflict:
apt-get -s dist-upgrade
apt-cache policy <PACKAGE>
apt-mark showhold
Reboot hangs at a stop job. There’s no universal safe threshold to wait before forcing it – observe the console, identify the actual unit, storage, or shutdown job that’s stuck, and treat a forced power-off as a last resort once progress has genuinely stopped and the storage risk is understood.
Web UI doesn’t load after update.
systemctl status pveproxy pvedaemon
journalctl -u pveproxy -b --no-pager
journalctl -u pvedaemon -b --no-pager
ss -ltnp | grep 8006
pvenode status
curl -k https://127.0.0.1:8006/api2/json/version
The last two commands separate local API availability from the proxy listener and remote reachability – a working local API with a failed remote check points at network/firewall, not the service itself. Restart only the specific failed service after reading the actual error, not both proactively.
VM/CT won’t start. Start with the actual task error from qm start <VMID> or pct start <CTID>, then check the current configuration before changing anything (qm config <VMID> or pct config <CTID>), then branch into storage, lock, device, bridge, or passthrough failures from there – don’t default to assuming a ZFS/module mismatch before checking. The VM won’t start diagnostic guide covers the full breakdown. Some post-update failures expose a configuration or hardware weakness that already existed – unstable passthrough that worked by luck, firmware quirks the old kernel tolerated, a bridge config that was always slightly off. Others are genuine kernel, driver, firmware, package, or bootloader regressions introduced by the update itself. Preserve the before-state and compare evidence rather than assuming which one it is.
Snapshots Are Not an Update Safety Net
“Take a snapshot before every update” sounds right but doesn’t actually help much here. VM snapshots roll back the VM’s disk state – they don’t help if the host kernel update breaks networking, since no VM can run if the host itself is unreachable and VM snapshots don’t protect the hypervisor. ZFS-root snapshots can help only when the host was deliberately designed with a tested boot-environment or rollback procedure – a dataset snapshot by itself is not a universal Proxmox host rollback.
What actually helps: a working configuration backup as described above, the previous kernel still installed (default behavior – don’t manually remove old kernels), a console access path independent of the host’s own networking, documented network config that can be reapplied manually, and verified current VM/CT backups kept separate from all of the above. Production-like homelabs typically separate VM backups from the host entirely, through Proxmox Backup Server or external storage – see the backup strategy guide for the full design. VM snapshots are still useful for testing risky changes inside a VM; they’re just not the update safety net.
Proxmox Update Validation
A finished reboot isn’t the same as a validated Proxmox update. Confirm host and boot state, storage, cluster/HA, then actually exercise workloads – not just check status flags:
# Host and boot
uname -r
pveversion -v
proxmox-boot-tool status
systemctl --failed
journalctl -b -p err --no-pager

# Storage
pvesm status
zpool status
ceph -s

# Cluster and HA
pvecm status
pvecm nodes
ha-manager status
pvesr status
journalctl -b -p err can include pre-existing or benign messages – use it to spot new, relevant failures, not as a requirement for a perfectly empty result. Then actually test: web UI, SSH, one representative VM and CT, guest networking, backup storage reachability, passthrough workloads, and live migration where relevant. Catching a problem here is a five-minute fix; catching it a week later, after normal operations resumed, is a much longer investigation.
FAQ
Can I run a Proxmox update without a reboot?
Yes, if nothing reboot-relevant is in the update. After a clean apt-get update, review apt list --upgradable and the simulated dependency-resolving upgrade – if no proxmox-kernel/pve-kernel packages appear, and no other low-level component (systemd, libc, microcode, bootloader, storage stack) needs one, the update applies without a reboot. Service restarts (pveproxy, pve-cluster) may briefly interrupt web UI access, but the host stays up. If a kernel package is present, it installs successfully without rebooting, but the running kernel doesn’t change – and its fixes aren’t active – until you actually reboot.
How do I know whether Proxmox actually needs a reboot?
Don’t rely on one signal. Compare the running kernel against what’s installed and pinned (uname -r vs dpkg -l 'proxmox-kernel-*' 'pve-kernel-*'), check proxmox-boot-tool status, and check /run/reboot-required if it exists on your install – useful when present, but not universal, so its absence alone doesn’t mean no reboot is needed.
Should I use the enterprise or no-subscription repository?
Enterprise if you have a valid subscription and want the most validated package set – it’s the recommended production channel. No-subscription is widely used for homelab and testing, updated more frequently, and not validated to the same level. Pick one deliberately and stay consistent rather than mixing them.
Can PVE 8 and PVE 9 nodes run in the same cluster temporarily?
A brief mixed-version state is part of the documented rolling major-upgrade process, not something to avoid entirely. Follow the official upgrade order, keep that window as short as practical, and don’t treat a prolonged mixed-major-version cluster as a normal long-term state.
Does a kernel rollback undo the whole update?
No. It selects an older kernel to boot from – it doesn’t roll back QEMU, LXC userspace, ZFS tools, Ceph, libc/systemd, or any configuration changes made during the update.
Is it safe to run a Proxmox update on a production server?
With the right preparation, running a Proxmox update on production is safe. The checklist that matters: confirmed routine-vs-major decision, verified repositories, a broader pre-update backup than just /etc/pve, console access available, a planned maintenance window, and VMs migrated or stopped before a kernel reboot. Bad experiences usually trace to skipping one of those – most often console access, or updating every cluster node at once. The package installation is rarely the actual problem; the reboot on a host with no fallback path is where things go wrong.
Official Sources
- Proxmox VE roadmap and release information
- Proxmox VE support lifecycle FAQ
- PVE 8-to-9 official upgrade procedure
- Package repositories
- Proxmox host-system administration and package updates
- Proxmox bootloader and kernel pinning
- High Availability, node maintenance, and HA disarm
- Cluster manager and quorum
- Proxmox backup and restore
Proxmox VE Series
28 articles – Installation · Storage · Networking · HA · Recovery