
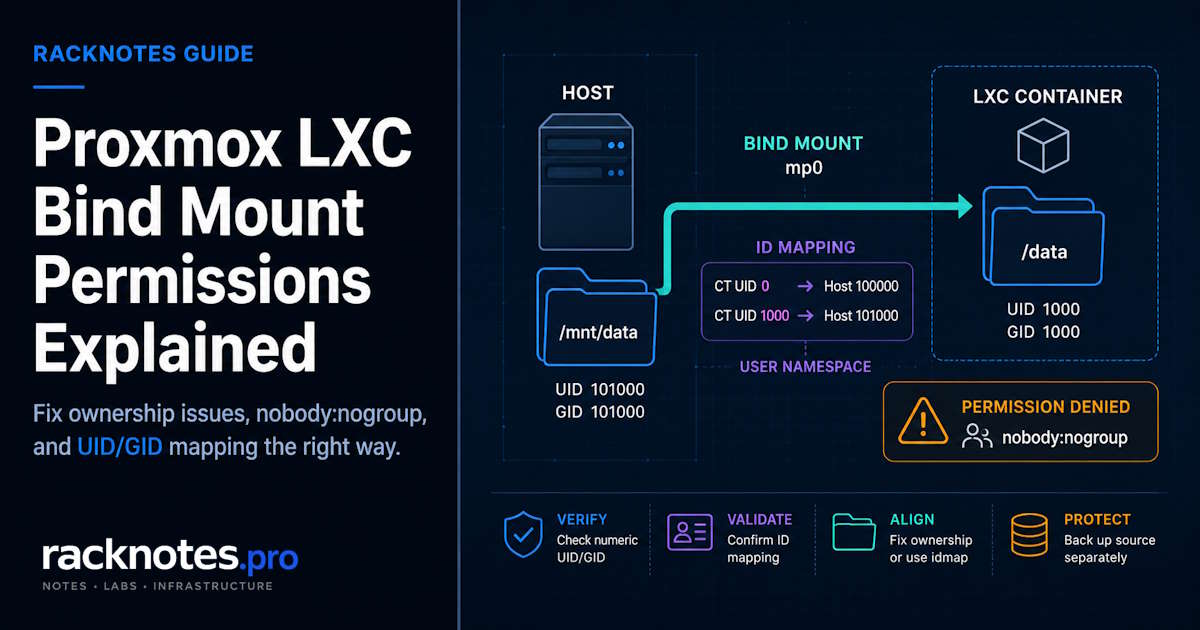
Proxmox LXC mount points let you expose an existing host directory inside a container with an mpX entry. For a normal host-path bind mount, the host keeps ownership of the underlying data while Proxmox tracks the container-side mount configuration – not the data behind it.
This guide covers adding and removing mount points, choosing bind mounts versus storage-backed volumes, fixing UID/GID permissions when the mount works but the application can’t read or write, and handling NFS/CIFS shares, backups, and migration.
To add a host directory to a Proxmox LXC container, create or verify the source directory on the Proxmox host, then add it as an mpX mount point:
pct set 200 -mp0 /mnt/bindmounts/media,mp=/mediaVerify it with pct config 200 and pct exec 200 -- findmnt /media. If the mount appears but the application gets Permission denied or sees nobody:nogroup, the mount itself is working – the next step is to check UID/GID mapping and ownership.
- Add an existing host directory with
pct set <CTID> -mp0 <host-path>,mp=<ct-path> - Use
mpXfor normal Proxmox LXC mount points; uselxc.mount.entryonly for advanced exceptions - A host-path
mpXbind mount is not Proxmox-managed storage and its data is not included invzdump - If the mount works but permissions fail, compare the application UID/GID, CT namespace map, and host file ownership
- On Proxmox VE 9.2+, per-mount
idmap=can solve some unprivileged-container mapping cases where the underlying filesystem supports it - Verify remote NFS/CIFS mounts before starting the CT so the container cannot silently write into an empty local fallback directory
How to Add a Mount Point to a Proxmox LXC Container
This Proxmox LXC add mount point workflow uses an mpX entry to expose an existing host directory inside the container. Stop the container first when practical, since not every mount-point change is safely hot-applied and some changes need a restart before the result can be judged accurately:
# Stop the CT before changing the mount point, when practical
pct stop 200

# Create the host-side source directory
mkdir -p /mnt/bindmounts/media

# Add it as mount point slot 0 on CT 200
pct set 200 -mp0 /mnt/bindmounts/media,mp=/media

# Confirm the entry landed in the container config
pct config 200

# Start the CT, then confirm it can actually see the mount
pct start 200
pct exec 200 -- findmnt /media
/mnt/bindmounts/media is the host source path; /media is where it appears inside the container. mp0 is the first of 256 available Proxmox LXC mount-point slots – mp0 through mp255 – and each is a configuration slot, not a guarantee about what’s actually behind it. This particular entry is a host-path bind mount: Proxmox tracks the mount-point configuration, but the directory itself sits outside Proxmox-managed storage entirely.
If the CT can’t be stopped right away, pct set can still be applied while it’s running. If the change doesn’t take effect cleanly, stop the CT, apply it, start it again, and verify with pct exec as above. For a read-only mount, add ro=1:
pct set 200 -mp0 /mnt/bindmounts/media,mp=/media,ro=1If pct config shows the entry and findmnt confirms it inside the container, the mount point itself is working. If the application then gets Permission denied or sees everything owned by nobody:nogroup, that’s a separate ownership problem – covered in Proxmox LXC Bind Mount Permissions below, not a sign the mount failed.
Bind Mount vs Storage-Backed Mount Point
The right method depends on what’s actually behind the path, so make that distinction before touching the config.
Which one should I use?
- Existing host directory -> host-path
mpXbind mount - Proxmox-managed extra CT disk -> storage-backed mount point
- Unsupported low-level mount option ->
lxc.mount.entry - Complex filesystem or kernel requirement -> consider a VM
| Requirement | Recommended method | Why |
|---|---|---|
| Additional CT volume eligible for Proxmox-managed backup, snapshot, and replication | Storage-backed mpX volume | Managed by Proxmox storage |
| Existing host directory | Host-path bind mount through mpX | Clear CT configuration, simpler lifecycle than raw entries |
| Host-mounted NFS/CIFS share | Mount on host, then mpX bind mount | Centralizes network mount and credentials |
| Per-mount ownership translation | idmap= on Proxmox VE 9.2+ | Avoids changing the whole CT’s mapping |
Low-level mount option mpX can’t express | lxc.mount.entry | Advanced exception, not a starting point |
| Complex filesystem, kernel module, or ACL model | VM | Cleaner ownership and kernel boundary |
Actual backup and replication behavior depends on the storage backend and mount-point options. A storage-backed mount point still needs backup=1 to be included in vzdump. Snapshot and replication support depend on the backend and replication configuration; they aren’t automatic just because the volume is storage-backed.
An mpX entry can point to a storage-backed Proxmox volume, a host-path bind mount, or a device mount. Only the first is actually managed by Proxmox storage. An mpX entry pointing to /mnt/... is still a host-path bind mount: Proxmox does not manage, snapshot, replicate, or back up the data behind that path. Creating or restoring arbitrary bind/device mount points is also restricted to root-level administration. A delegated Proxmox role that can manage normal guest disks may still be unable to restore a CT backup containing a host-path bind mount.
Proxmox LXC Disk vs Mount Point
A managed CT disk or volume has its lifecycle handled by Proxmox storage – snapshots, replication, and vzdump backup all apply where the backend and configuration support them. A bind mount is an external host path exposed inside the CT; Proxmox tracks the configuration entry, not the data. Don’t treat the two as interchangeable for backup or snapshot planning – a mount point that looks identical in pct config can have completely different data-protection behavior depending on which type it actually is.
Proxmox LXC Bind Mount Permissions
Proxmox LXC bind mount permission errors follow a predictable pattern: the mount shows up fine, ls even lists the files, but the application inside the container gets Permission denied or sees everything owned by nobody:nogroup. The mount worked. The ownership translation didn’t.
That translation problem sits in one of four places: host filesystem ownership, the container’s user namespace mapping, remote-filesystem semantics for NFS or CIFS, or the actual UID the application runs as inside the container. Solving a Proxmox LXC mount point permissions problem means working through all four in the order that resolves fastest. The same ownership model applies whether the container is running a media server, a database, or a Docker workload that expects specific host paths.
| Symptom | First check |
|---|---|
Files appear as nobody:nogroup | Compare numeric ownership with the CT namespace map |
| Host can write, application cannot | Check the actual application UID/GID and the ACL/mode bits |
| Works, then breaks after a node reboot | Confirm the NFS/CIFS share is really mounted before CT startup |
CT fails to start after adding idmap= | Check filesystem support and the mount/start logs |
| Migration is blocked or the data looks wrong | Confirm identical path and shared=1; treat migration as offline |
| Restore succeeds but data is missing | Restore the bind-mounted data separately from the CT |
How UID/GID Mapping Works in Unprivileged LXC
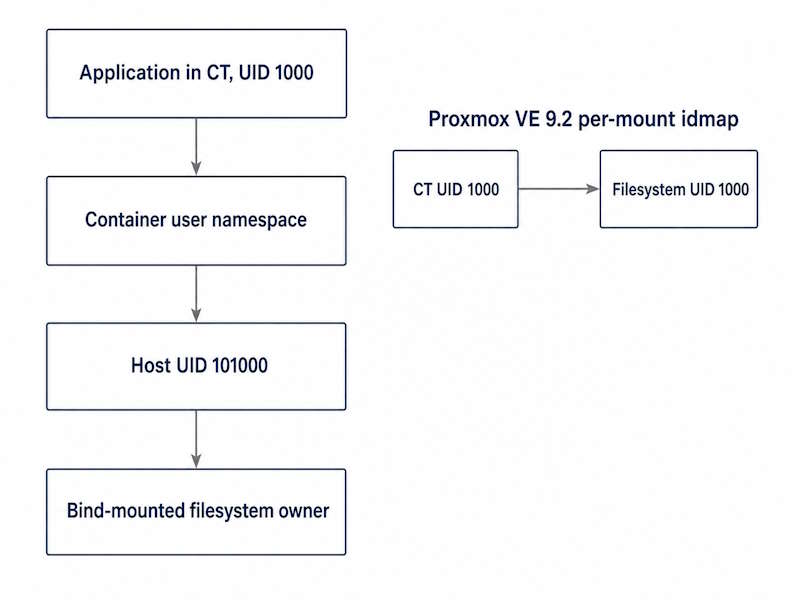
This is the mechanism behind almost every Proxmox LXC UID mapping and bind-mount permission issue. Unprivileged containers use Linux user namespaces to remap UID/GID ranges: a process can be root inside the container’s namespace while being an ordinary, unprivileged user on the host. Per the official Proxmox Container Toolkit documentation, in a default unprivileged CT, UID 0 commonly maps to host UID 100000, and UID 1000 to host UID 101000 – a fixed offset applied across the whole ID range. The 100000 offset is the normal Proxmox default, but it isn’t universal. Custom global mappings, restored configurations, or manually edited subuid/subgid ranges can produce different values, so verify the active map before changing ownership based on this number alone.
| CT model | Container UID 0 on host | Bind-mount convenience | Security position |
|---|---|---|---|
| Unprivileged | Remapped, commonly to 100000 | Requires UID/GID alignment | Recommended default |
| Privileged | Host UID 0 | Simpler ownership behavior | Weaker isolation; trusted workloads only |
A bind-mounted directory keeps its original host-side ownership. If its numeric UID or GID cannot be represented through the container’s active mapping, Linux exposes the overflow identity, commonly shown as nobody:nogroup. That is usually expected overflow behavior. Before treating it as a mapping-only problem, confirm the underlying file isn’t genuinely owned by UID/GID 65534 and that NFS squash rules aren’t deliberately producing the anonymous identity.
Find the actual application UID/GID before touching anything:
# Identify the application process and its UID/GID inside the CT
pct exec 200 -- ps -eo user:20,uid,gid,comm,args
pct exec 200 -- id appuser

# Inspect the container's own user namespace mapping (not the host shell's)
pct exec 200 -- cat /proc/1/uid_map
pct exec 200 -- cat /proc/1/gid_map
A common mistake is checking /proc/self/uid_map on the host shell. That shows the host process’s own mapping, not the container’s. Read the CT’s mapping from inside the CT namespace with pct exec; otherwise, you’re not looking at what the container actually sees.
Choose a UID/GID Mapping Strategy
These ownership fixes differ in scope. Start with the least invasive option and move to broader mapping changes only when necessary.
Default Shifted UID/GID Mapping
CT UID 0 maps to host UID 100000 and CT UID 1000 to host UID 101000, with no custom config needed. This is the simplest default and works well for a dedicated local dataset chowned to match the offset. After confirming the application’s UID/GID and the CT’s default offset, create a dedicated source directory with matching ownership rather than recursively changing an existing tree:
# Create a dedicated empty source with mapped ownership
install -d -m 0750 -o 101000 -g 101000 /mnt/bindmounts/appdata

pct set 200 -mp0 /mnt/bindmounts/appdata,mp=/data
101000 is only correct when CT UID/GID 1000 maps through the default 100000 offset – verify the active uid_map/gid_map first. The tradeoff with this approach is host and NAS-side ownership living at unusual, high numeric IDs.
Per-Mount idmap= in Proxmox VE 9.2+
Proxmox VE 9.2 introduced idmap= for individual rootfs and mpX mount points, built on the kernel’s ID-mapped mounts mechanism. It customizes translation for one mount without touching the container’s global lxc.idmap. It only works for unprivileged containers, unmapped IDs fall back to lxc.idmap, and the filesystem must support ID-mapped mounts. Don’t assume a network filesystem does without testing.
The option takes one idmap= field with semicolon-separated entries in type:container-id:disk-id:range-size format. Confirm the host is running Proxmox VE 9.2 or later before relying on this syntax:
mp0: /mnt/bindmounts/appdata,mp=/data,idmap=u:1000:1000:1;g:1000:1000:1This maps container UID 1000 to disk UID 1000 and container GID 1000 to disk GID 1000, covering one ID each; everything else falls back to the container’s default mapping. Map only the identities the workload actually requires, and keep the source path narrowly scoped – don’t map a container identity to a sensitive disk UID merely to make ownership look convenient. On the CLI, quote the whole mount-point argument so the shell doesn’t interpret the semicolon:
pct set 200 -mp0 '/mnt/bindmounts/appdata,mp=/data,idmap=u:1000:1000:1;g:1000:1000:1'Stop the CT, record the original mpX line, apply the mapping, then start the CT and verify numeric ownership and actual application operations. Don’t judge from ls -l alone. Don’t reuse 100000 by habit; inspect the real source owner and the application’s actual UID/GID first, then build the mapping around those two numbers:
stat -c '%u:%g %n' /mnt/bindmounts/appdataIf the mount fails after adding idmap=, check for the specific failure rather than guessing:
pct start 200
journalctl -b | grep -Ei 'idmap|mount_setattr|operation not supported|invalid argument'
If it fails only after the mapping is added, remove it and solve the identity problem at the NFS or CIFS layer instead – not every filesystem supports ID-mapped mounts, and forcing it isn’t the fix.
When Global lxc.idmap Is Required
Global mapping changes every filesystem view in the container, not just one mount point. It needs complete, non-overlapping UID/GID ranges matched against host /etc/subuid//etc/subgid. An incomplete or overlapping map can prevent the CT from starting or expose a host identity too broadly, so this guide doesn’t offer a universal copy-paste map. Use per-mount idmap= on 9.2+ where the default offset doesn’t fit, or build and test a mapping plan specific to the exact CT and service identities.
Recommended order: the default shifted mapping first, per-mount idmap= second on Proxmox VE 9.2+, and a validated global mapping only as an advanced fallback when neither fits.
Mount an SMB/CIFS Share to a Proxmox LXC
A Proxmox LXC bind mount over CIFS fails for a different reason than NFS usually does. The flow has four steps: mount SMB on the Proxmox host, verify the host mount, bind mount the host path into the CT, then verify ownership from both the host and CT views.
CIFS mount options control how ownership appears on the client side, and normal presentation differs from forced presentation. Per the mount.cifs manual, uid= and gid= provide the local ownership used when the server doesn’t supply usable Unix ownership information. forceuid and forcegid go further and tell the client to ignore whatever ownership the server returns, forcing the specified IDs instead. file_mode and dir_mode affect the client-side mode the mount presents. All CT processes accessing this share ultimately operate through the SMB credentials used for the host mount. Local UID presentation doesn’t create separate server-side SMB identities, and the server’s own credentials and ACLs still decide whether an operation is actually allowed.
For an application running as UID/GID 1000 inside a default unprivileged CT, the corresponding host IDs are commonly 101000:101000 – not 1000:1000, which is the mistake that produces nobody:nogroup even when the mount options look reasonable. Let the client negotiate the highest supported SMB2+ dialect unless your environment specifically requires and has tested a fixed version:
//nas/share /mnt/cifs/share cifs credentials=/root/.cifs-cred,_netdev,uid=101000,gid=101000,forceuid,forcegid,file_mode=0660,dir_mode=0770 0 0Verify the CT’s actual mapping before reusing 101000 here – it’s an example based on the default offset, not a universal constant. Confirm both sides after mounting:
stat -c '%u:%g %A %n' /mnt/cifs/share
pct exec 200 -- stat -c '%u:%g %A %n' /share
Also lock down the credentials file:
chown root:root /root/.cifs-cred
chmod 600 /root/.cifs-cred
noperm disables local client permission checks entirely and shouldn’t be treated as a default fix – it removes a check rather than resolving the mismatch underneath it.
Mount an NFS Share to a Proxmox LXC
NFS is where a Proxmox LXC bind mount problem most often gets misdiagnosed. In the default host-mounted, unprivileged-CT design, start with numeric-identity translation rather than export policy. When NFS is mounted on the Proxmox host and then bind-mounted into a default unprivileged CT, the NFS client sends the effective host-side numeric identity – CT UID 0 normally arrives at the NFS layer as host UID 100000, not as UID 0. Per the Linux NFS exports manual, root_squash specifically maps requests from UID/GID 0 to an anonymous identity, so it only applies to requests that actually reach the server as UID/GID 0 – all_squash, anonymous IDs, NFSv4 identity mapping, and export ACLs can still be the primary cause even when root_squash itself isn’t relevant.
First determine which host-side UID/GID the container process becomes, then compare that value with ownership and export policy on the NFS server:
- Identify the application UID/GID inside the CT
- Inspect the same file numerically on the Proxmox host
- Inspect ownership numerically on the NFS server
- Confirm NFS version and NFSv4 ID-mapping configuration where relevant
- Check export options, including
root_squash,all_squash,anonuid, andanongid - Test with a dedicated directory rather than changing the whole export
Don’t reach for no_root_squash as a routine permissions fix – it expands the trust given to the NFS client and should only be used when the security implications are a deliberate choice, not a shortcut.
Prevent Empty Local Directory Fallbacks After Reboot
A network bind mount adds one failure mode that local storage doesn’t have. If an NFS or CIFS mount is unavailable when the CT starts, the host path can still exist as an ordinary empty directory, and the container can write into that local directory instead of the intended remote share. This failure mode is costly because nothing necessarily errors. Confirm the underlying network path to the NAS is actually up before assuming the mount itself is the problem, and check more than the directory’s existence: confirm the actual filesystem type, source, and target:
findmnt -T /mnt/nfs/media -n -o FSTYPE,SOURCE,TARGET
mountpoint -q /mnt/nfs/media
A plain test -d or a manual mountpoint -q /mnt/nfs/media && pct start 200 check is useful for a one-off test, but neither is a persistent boot-time control, and a .automount unit by itself isn’t a fail-closed guarantee either – it can still leave the CT starting against an empty directory if nothing actually blocks startup on mount failure. Make the remote mount a real dependency of the CT’s own startup path: add a validated systemd drop-in on pve-container@<CTID>.service using RequiresMountsFor= for the mount path, or a tested CT hook script that exits during pre-start when mountpoint -q (or the findmnt check above) fails. Test whichever method you choose against an actual node reboot before relying on it, not just a manual mount/unmount cycle.
How to Remove a Proxmox Mount Point
Removing a mount-point entry only removes the configuration line – it does not touch the host source directory or its data. Confirm which slot you’re removing before running anything:
# Confirm the exact mount-point slot and source path first
pct config 200

# Stop the container first when possible, then delete the entry
pct stop 200
pct set 200 -delete mp0

# Confirm the entry is gone
pct config 200
The host directory at the old source path – /mnt/bindmounts/media in the earlier example – is untouched and still contains whatever was there. If you actually want to delete the data too, that’s a separate, deliberate step on the host filesystem, not something -delete mp0 does for you.
For a host-path bind mount, deleting mp0 removes the CT configuration entry but leaves the host directory intact. A Proxmox-managed storage volume has a different lifecycle: detaching a managed mount-point volume can leave it referenced as an unusedX volume, and deleting that unused volume can destroy the underlying managed data. Check the resulting pct config 200 before deleting any unusedX entry.
Backups, Snapshots, and Restore
Backup problems with Proxmox LXC bind mounts often surface only during a restore. A host-path bind mount is never included in vzdump, regardless of backup=0 or backup=1; Proxmox preserves the mount-point config, not the data behind it. Restoring a backup with bind/device mount-point definitions may also need root-level administration; a delegated user can hit an error even with otherwise broad VM/CT permissions.
| Mount type | Managed by Proxmox storage | vzdump data backup | Snapshot/replication |
|---|---|---|---|
| Root filesystem | Yes | Yes | Depends on backend |
| Storage-backed mount point | Yes | Yes when backup=1 | Eligible per backend and mount-point configuration – verify snapshot support and the replicate setting |
| Host-path bind mount | No | Never | External to CT snapshot/replication |
| Device mount point | No | Never | External to normal CT lifecycle |
Raw lxc.mount.entry | No | Data not managed by Proxmox | Requires a separate lifecycle plan |
A restored CT can contain the correct bind-mount entry even when the mounted data itself was never restored. A clean config restore only means Proxmox reapplied the mount-point definition; the data is expected to already exist independently at that path. Cover each source separately: a local directory via proxmox-backup-client, snapshots, or another file-level tool; an NFS/CIFS share at the NAS/server side; application-native dumps for anything transactional. Test both the CT restore and the external-data reattachment, not just one.
- Restore the CT.
- Confirm every bind-mount source actually exists at the expected path – and that it’s the correct source filesystem/data set, not just a path with the right name.
- Confirm remote filesystems are genuinely mounted, not represented by an empty directory.
- Confirm numeric ownership from both the host and CT views.
- Confirm the application process UID/GID inside the restored CT.
- Confirm read/write behavior with a disposable test file before trusting it – and confirm nothing already wrote into an empty fallback directory before the external data was reattached.
- Restore external data through its own backup method, separately from the CT restore.
- Start the application only once the storage dependency is confirmed healthy.
See the PBS restore guide for the mechanics of the CT-level restore itself – this checklist is what to verify once that restore completes.
Migration and Multi-Node Portability
A Proxmox LXC bind mount that works on one node can fail silently on another if the paths aren’t identical. Treat migration with host-path bind mounts as offline unless current Proxmox documentation explicitly supports the exact mode you need – stop the workload, verify the source on every candidate node, and test the target before relying on HA or planned migration. A container that might move needs identical source paths, identical NFS/CIFS mounts with equivalent options, securely reproduced credentials everywhere it could run, and matching UID/GID mapping and Proxmox version on the destination:
findmnt -T /mnt/nfs/media -n -o SOURCE,FSTYPE,TARGET,OPTIONS
stat -c '%u:%g %A %n' /mnt/nfs/media
Run this on every candidate node – don’t compare only directory names. The shared=1 mount-point option is easy to misread: it does not mount or replicate the source. It only tells Proxmox that the non-volume path is already available on all nodes – every target node still has to independently expose the same working path and permissions, or the container starts on the new node with a broken or empty mount. The flag is an assertion to Proxmox, not a verification mechanism – Proxmox does not confirm that the path actually contains the same filesystem or data on every node, so two nodes with identically named but different local directories will look correct right up until the container reads the wrong data.
- Use identical source paths on the destination node.
- Mount the same NFS/CIFS share with equivalent options.
- Reproduce credentials securely, not by copying plaintext files casually.
- Verify UID/GID mapping and Proxmox VE version on the destination.
- Use
shared=1only when the source is genuinely shared across nodes already. - Test migration with the workload stopped before relying on it operationally.
- Remember that marking a path shared does not copy or synchronize any data.
When lxc.mount.entry Is Still Useful
Not every Proxmox LXC mount point goes through mpX. Raw lxc.mount.entry lines bypass Proxmox’s own mount-point tracking and go straight to LXC’s low-level config. Use them only for mount options or sources that mpX genuinely can’t express, not as a starting point.
lxc.mount.entry: /srv/shared data none bind,create=dir,optional 0 0/srv/shared is the host source. data is relative to the CT root filesystem and becomes /data inside the container. create=dir creates the target directory if it doesn’t exist. optional lets LXC ignore an actual mount-entry failure – it does not verify that a host network mount is genuinely backed by the intended remote filesystem. If the source directory exists locally after the network mount fails, the bind can still succeed and quietly expose the wrong local directory instead of erroring. For critical storage, omitting optional is usually safer: startup should fail rather than proceed quietly with missing data. Proxmox doesn’t track this as an mpX resource, which means none of the GUI-managed lifecycle conveniences apply to it.
FUSE filesystems such as SSHFS, rclone mounts, and mergerfs need one specific caution. Proxmox documentation advises against mounting FUSE filesystems directly inside a CT because container backup modes may need to freeze the CT, and FUSE mounts complicate that. Where possible, mount the FUSE filesystem on the Proxmox host and expose it as a bind mount instead. The host-level FUSE mount still needs its own monitoring and the same fail-closed startup dependency used for NFS/CIFS above. Moving the FUSE layer to the host doesn’t make the storage inherently reliable; it keeps the backup-freeze problem out of the container.
Troubleshooting Proxmox LXC Mount Points
Diagnosing a Proxmox LXC mount point issue works best in a fixed order. Read the ownership chain in order rather than guessing at the first symptom that looks familiar:
# Container configuration and mount target
pct config 200
pct exec 200 -- findmnt /media

# Numeric ownership, both sides
stat -c '%u:%g %A %n' /mnt/bindmounts/media
pct exec 200 -- stat -c '%u:%g %A %n' /media

# Application identity inside the CT
pct exec 200 -- ps -eo user:20,uid,gid,comm,args
pct exec 200 -- id appuser
Comparing ownership tells you what should happen. A disposable test confirms what actually happens. Run every step as the real application account, not root, and cover more than file creation:
pct exec 200 -- runuser -u appuser -- sh -c 'printf "bind-mount-test\n" > /media/.bind-mount-test'
stat -c '%u:%g %A %s %n' /mnt/bindmounts/media/.bind-mount-test
pct exec 200 -- runuser -u appuser -- mv /media/.bind-mount-test /media/.bind-mount-test-renamed
pct exec 200 -- runuser -u appuser -- rm /media/.bind-mount-test-renamed
Use a disposable path – don’t test by creating files in a live database or application data directory. This confirms the application can actually write, rename, and delete as itself, that the resulting file lands with the expected host-side UID/GID, and that the problem isn’t limited to a root-only check that masked a real application-level failure.
/proc/1/uid_map inside the CT shows the container’s process user namespace. A Proxmox VE 9.2 per-mount idmap= is a separate mount-ownership translation layered on top of that. A full picture therefore needs both pct config and the numeric ownership actually seen at the mount point, not just one or the other.
For a CT that fails to start after a mount change:
pct start 200 --debug
journalctl -b | grep -Ei 'lxc|apparmor|mount|idmap'
dmesg | grep -Ei 'apparmor|denied'
The Proxmox logs guide covers where else to look when the journal output alone doesn’t point at a clear cause.
Verify first, apply the simplest matching fix second, reach for a custom mapping last. Reversing that order is how a five-minute ownership check turns into an afternoon rebuilding a container that won’t start. Avoid a recursive chown -R across a large NAS tree as a first response to a permission mismatch – it fixes one container’s access while quietly breaking every other service, host process, or backup job that depended on the previous ownership.
A privileged CT is not a permissions troubleshooting technique. It changes container root from a remapped unprivileged host identity to a much more trusted host identity, and it weakens the isolation boundary that makes unprivileged the recommended default. It also doesn’t bypass NFS export policy or SMB server ACLs – server-side identity rules still apply regardless of the container’s privilege mode. Changing an existing CT between privileged and unprivileged modes isn’t a normal toggle, either – it generally needs a controlled backup/restore or rebuild process with ownership validation. Use a privileged container only when a workload’s documented requirements justify it and the data source is trusted, not as a shortcut around a permission error.
When to Use a VM Instead
Sometimes the right fix for a stubborn Proxmox LXC bind mount problem is to stop fighting it. If the workload needs kernel modules the host doesn’t provide, a genuinely complex multi-user ACL design, or a filesystem the container’s shared kernel can’t support, that’s the signal to stop tuning UID mappings and move the workload to a VM instead. A VM’s own kernel and storage stack remove the LXC user-namespace translation layer covered in this guide – NFS UID alignment, CIFS mount options, and server-side ACLs can still require configuration, but they’re no longer combined with the container’s host-side UID shift on top. Fighting the container’s shared-kernel model past that point usually costs more time than the VM would have.
Final Recommendation
A Proxmox LXC mount point isn’t complicated because the tooling is bad – it’s complicated because a shared-kernel container, a remote filesystem, and a user namespace are three separate ownership models stacked on top of each other, and a permission error can originate from any layer.
For most home lab and small-business deployments, a practical default is mpX, with remote storage mounted and verified on the host before it reaches the container, a real fail-closed startup dependency, and an unprivileged CT as the default privilege model. Use Proxmox VE 9.2’s per-mount idmap= only where the default offset doesn’t fit. Bind-mounted data still needs its own backup plan because vzdump never includes that data.
FAQ
How do I add a mount point to a Proxmox LXC container?
Create or verify a source directory on the Proxmox host, then add it as an mpX entry with pct set: mkdir -p /mnt/bindmounts/media followed by pct set 200 -mp0 /mnt/bindmounts/media,mp=/media. Verify with pct config 200 and pct exec 200 -- findmnt /media. See How to Add a Mount Point to a Proxmox LXC Container above for the full walkthrough, including when to stop the container first.
What is the difference between a Proxmox LXC mount point and a bind mount?
Every mpX entry is a Proxmox LXC mount point, but not every mount point is a bind mount. A storage-backed mount point is a Proxmox-managed volume with its own lifecycle – snapshots, replication, and vzdump backup can apply. A host-path bind mount, also configured through mpX, points at an existing directory on the Proxmox host instead; Proxmox tracks the configuration entry but doesn’t manage, snapshot, or back up the data behind it.
Why does my bind mount show nobody:nogroup?
This is the single most common Proxmox LXC bind mount symptom. The source file’s numeric UID/GID can’t be translated through the container’s current user-namespace or mount mapping, so Linux displays the overflow identity, commonly nobody:nogroup. Compare numeric ownership with stat on the host and inside the CT before changing any permissions – and rule out a genuinely-owned UID 65534 or a deliberate NFS squash result first.
How do I fix Proxmox LXC mount point permissions?
Compare the application’s actual UID/GID inside the container with the numeric ownership of the host-side source directory, using pct exec 200 -- id appuser and stat -c '%u:%g' on both sides. With the default mapping shown earlier, a mismatch there – not a broken mount – is the usual cause of Permission denied or nobody:nogroup. Fix it with a dedicated, correctly-owned source directory, or Proxmox VE 9.2’s per-mount idmap= where the filesystem supports it – not a recursive chown -R across shared storage.
Should I use mp0 or lxc.mount.entry?
Use an mpX entry by default. Proxmox tracks the container path and related mount options, though a host-path bind mount still remains outside the Proxmox storage subsystem either way. Use lxc.mount.entry only when you need a low-level LXC mount option mpX genuinely can’t express.
How do I remove a mount point from a Proxmox LXC container?
Run pct set <CTID> -delete <mpX>, for example pct set 200 -delete mp0, after confirming the correct slot with pct config <CTID>. This removes the configuration entry only – the host source directory and its data are untouched.
Does Proxmox back up LXC bind mounts?
No. vzdump preserves the bind-mount configuration but never backs up the data behind a host-path bind mount. The backup=1 option applies to storage-backed mount-point volumes, not arbitrary host directories. Back up the source directory or NAS data separately, and expect that restoring the mount-point definition itself may require root-level administration.
Does per-mount idmap work with NFS and CIFS?
Per-mount idmap= depends on ID-mapped-mount support in the underlying filesystem. Network filesystems such as NFS or CIFS can reject the required mount operation, so do not assume support from the Proxmox version alone – for NFS and CIFS, numeric-ID alignment or CIFS mount ownership options are the more dependable path. Test the exact platform before relying on idmap= for a network share.
Proxmox VE Series
28 articles – Installation · Storage · Networking · HA · Recovery