
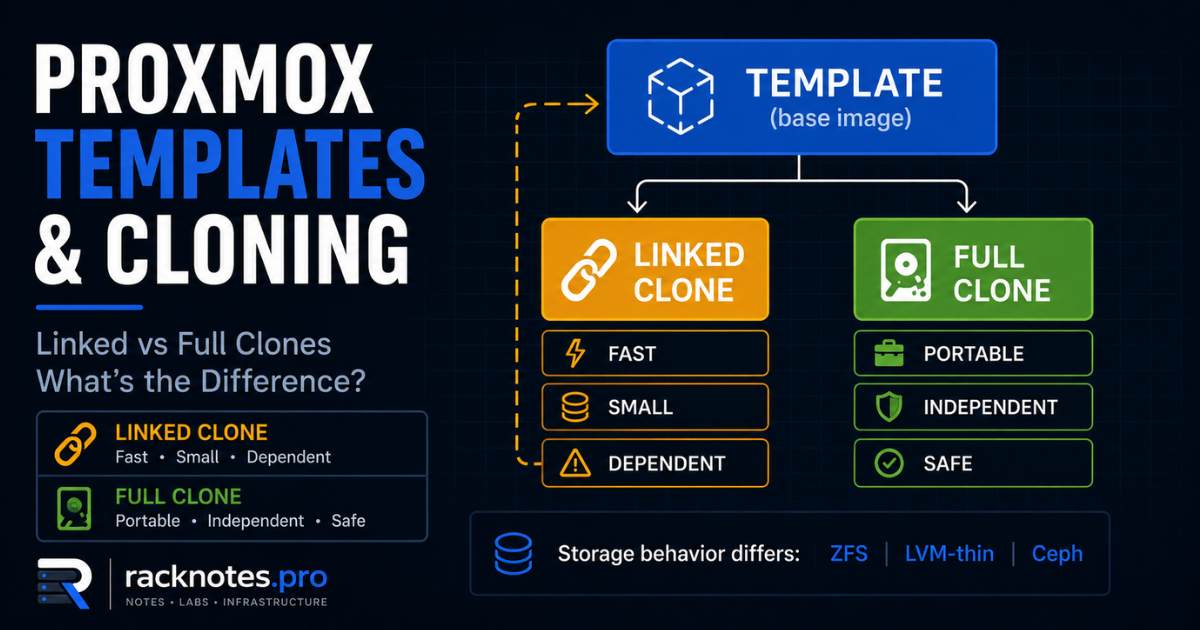
A Proxmox VM template is a contract: every VM cloned from it inherits whatever is in it, mistakes included. A sloppy template means cloning the same problem a hundred times; a clean one means spinning up a new server in under a minute from a known-good base.
This guide covers how to build Proxmox VM templates correctly, how to choose between linked and full clones, and the operational pitfalls that catch operators who skip the details. It focuses on manually built Linux templates and cloud-init images – Windows generalization needs Sysprep and a different identity workflow that’s out of scope here.
- Build Proxmox VM templates right or rebuild them – mistakes propagate to every clone.
- Linked-clone dependency and deletion behavior are backend-specific: qcow2 and ZFS keep an explicit base relationship, LVM-thin uses block-level reference counting instead.
- To detach a linked clone without losing its changes, full-clone the linked clone itself, not the original template – and shut it down first for a clean, consistent copy.
- Verify every clone before it goes into service: unique machine-id, IP, SSH host keys, agent responding.
This guide is for you if: you deploy Linux VMs repeatedly in a homelab or SMB environment, want faster provisioning with fewer configuration mistakes, or are choosing between linked and full clones.
Skip this guide if: you only run one-off VMs that will never be cloned, or you already automate everything with Terraform or Packer. Templating also fits poorly for pfSense/OPNsense (per-instance MAC bindings and sometimes license keys), TrueNAS (instance-specific disk assignments), and other licensed appliances tied to machine identity – a snapshot before major changes plus a solid backup strategy covers those better. See Proxmox Backup Strategy. Windows guests can be templated too, but need Sysprep and a different identity workflow this guide doesn’t cover.
A Proxmox VM template is a read-only source VM used to create linked or full clones. Build or import the Linux image, generalize its identity, shut it down, run qm template <VMID>, and verify every clone before deployment.
The quick Proxmox VM templates workflow
| Step | Action |
|---|---|
| 1 | Build or import the Linux image |
| 2 | Install and verify the QEMU guest agent |
| 3 | Generalize machine identity and cloud-init state |
| 4 | Shut down without rebooting |
| 5 | Run qm template <VMID> |
| 6 | Create a linked or full clone based on storage and independence requirements |
| 7 | Verify hostname, machine ID, IP, SSH keys, and guest agent |
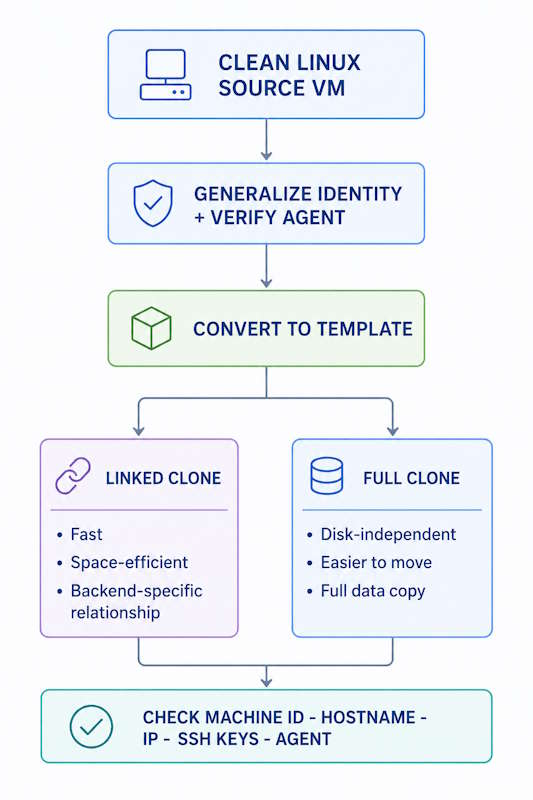
Manual Linux image vs cloud-init image
These two identity-cleanup paths overlap but aren’t identical, and combining both without testing the resulting boot is a common source of clones that come up broken. Pick one path per template – the exact commands for each are in the build section below.
| Template type | Identity cleanup |
|---|---|
| Manual Linux installation without cloud-init | Empty machine ID and provide a tested SSH-key regeneration path |
| Cloud-init image or cloud-init-enabled template | Use cloud-init clean --logs --machine-id (cloud-init 23.1+) and verify first-boot behavior |
Many operators start from an official Debian or Ubuntu cloud image instead of a full manual install: create an empty VM shell, import the cloud image as its disk, attach a cloud-init drive, enable the serial console and guest agent, then convert to a template. Cloud-init handles hostname, network, and SSH-key injection per clone from there. The Proxmox VE Cloud-Init documentation covers the full import and configuration reference.
Linked clone vs full clone
A full clone copies the VM’s disk contents into independent target volumes. Its disks no longer depend on the source template, though the resulting image isn’t necessarily bit-for-bit identical at the file or metadata level – qcow2 metadata, internal snapshots, and allocation can differ. That makes the storage relationship portable, but the VM configuration may still carry node- or storage-specific dependencies: a local bridge name, PCI/USB passthrough, host CPU features, local ISO media, EFI/TPM state on separate storage, local cloud-init media, or node-specific tags, HA config, and hookscripts. Validate the complete configuration before migrating a full clone to another node or storage pool.
A linked clone uses copy-on-write: it shares the template’s read-only base disk and only stores blocks that change. It’s near-instant to create with minimal initial storage. A linked clone always begins by sharing data with its source, but the long-term dependency and deletion behavior are backend-specific – see the storage-backend table below before assuming a rule that applies everywhere.
One thing the GUI doesn’t make obvious: linked clones can only be created from Proxmox VM templates. Cloning a regular VM always produces a full clone regardless of what you select – the mode dropdown only appears when the source is a template.
| Choose linked clone when | Choose full clone when |
|---|---|
| Rapid provisioning and space efficiency matter | Independence is required |
| The base lifecycle is centrally managed | Template deletion must never affect the VM |
| Shared or backend-native clone behavior is understood | Cross-storage portability is important |
| VM divergence is expected to stay limited | Large long-term divergence is expected |
| Dependency monitoring is acceptable | Simpler recovery and lifecycle are preferred |
Linked clones aren’t only for short-lived dev/test VMs – they can run VDI pools, managed lab fleets, and long-lived controlled deployments where the base is centrally maintained and divergence is watched. Full clones remain the right default whenever independence matters more than storage efficiency.
Storage-backend matrix
Not every storage backend supports linked clones from Proxmox VM templates, and file-based storage specifically needs the right image format. The Proxmox VE Storage documentation covers backend capabilities in detail – this table isn’t exhaustive, verify behavior on any backend not listed here.
| Backend | Linked clone mechanism | Template/base relationship |
|---|---|---|
| Directory/NFS with qcow2 | Backing file | Explicit base image remains required |
| ZFS | Snapshot/clone origin | Origin relationship normally remains |
| LVM-thin | Thin snapshot/block references | Shared blocks remain while referenced; behavior differs from qcow2/ZFS |
| BTRFS | Native subvolume/snapshot clone | Backend-native relationship; verify deletion and migration behavior on the current Proxmox version |
| Ceph RBD | RBD snapshot/clone | Backend-native parent relationship; use Proxmox-supported full clone, move, or restore workflows for independence |
| Thick LVM | No linked clone | No storage snapshots; Proxmox can still create a full clone by copying the complete disk into a new logical volume |
| Plain iSCSI LUN | No native linked clone | Full-copy behavior depends on the supported storage layer above the LUN |
On qcow2 and normal ZFS workflows, the clone keeps an explicit base/origin relationship, and Proxmox normally prevents deleting the required base while a linked clone still references it. LVM-thin uses block-level reference counting instead – Proxmox staff have confirmed a linked clone on LVM-thin can remain bootable after the template is deleted, because the referenced blocks stay allocated while still in use. Verify behavior on your exact Proxmox version and storage backend before designing a lifecycle around deleting the template; don’t assume the qcow2/ZFS rule applies to LVM-thin, and don’t run manual backend-native flattening (like a raw rbd flatten) outside Proxmox’s own lifecycle management – it can leave storage metadata and VM configuration out of sync with what Proxmox expects.
If you try to create a linked clone on unsupported storage or an unsupported image format:
Linked clone feature is not supported for drive 'scsi0'On file-based storage, preallocation=falloc can make a linked qcow2 child consume close to its full virtual size even though it still has a backing file and remains logically linked – it doesn’t silently turn into a full clone, but the storage-saving benefit is largely lost. Use off or metadata when space-efficient linked clones are the goal, and verify the result rather than assuming from file size alone:
qemu-img info /path/to/vm-<VMID>-disk-0.qcow2Check backing file, virtual size, and disk size in the output – don’t classify a clone as full or linked based on file length.
Migration is backend-specific too. A linked clone on local qcow2 or local ZFS can’t be storage-migrated as though it were independent from the base – the base and child normally must move or remain accessible together:
ERROR: can't migrate '...:base-9000-disk-0/vm-101-disk-0' as it's a clone of 'base-9000-disk-0'Compute migration is possible when the entire storage relationship is shared across the destination nodes – Ceph RBD, NFS, or a separately designed shared ZFS architecture, not a normal node-local ZFS pool. LVM-thin and RBD use different storage-native clone semantics, so validate migration behavior on the exact backend rather than applying one universal rule. Workaround: create an independent full clone first, then migrate that.
Build and generalize the source image
Hardware settings
The hardware configuration you set in the base VM is inherited by every clone. VirtIO SCSI Single with per-disk IO Thread is a strong general-purpose default for modern Linux guests with the required drivers – it’s been the Proxmox default for new Linux VMs since PVE 7.3, and one controller per disk gives each disk its own IO thread for measurably better performance under concurrent I/O. Validate it for Windows images and specialized appliances before locking it into a template. VirtIO Block is also a maintained high-performance option and supports discard on Linux guests running kernel 5.0 or later – don’t treat every non-VirtIO-SCSI controller as lacking discard support; controller choice depends on the guest and workload.
On the disk itself, discard and SSD emulation are typically what you want on a general-purpose template. Enable SSD emulation when you intentionally want the guest to treat the disk as non-rotational – it doesn’t verify the physical backend actually is SSD, it just changes what the guest OS assumes for scheduling, so set it based on desired guest behavior rather than as an automatic checkbox. Discard is what lets the guest signal freed blocks back to the storage pool; without it, deleted files inside the guest don’t shrink the underlying volume.
When changing an existing disk line, read the current configuration first rather than rewriting the whole line from an example – a copied line can silently drop iothread, cache mode, backup flags, or replication settings that were already set:
qm config 9000Reproduce the full existing line with only the intended option changed, or make the change through the GUI instead of a blanket CLI replacement. Example of the target state, not a copy-paste replacement for your actual line:
scsi0: local-lvm:vm-9000-disk-0,discard=on,ssd=1,iothread=1Enable the QEMU guest agent:
qm set 9000 --agent enabled=1,fstrim_cloned_disks=1You also need to install the agent inside the guest (qemu-guest-agent on Debian/Ubuntu) and confirm it’s running before converting to a template. fstrim_cloned_disks=1 tells Proxmox to issue a guest-agent trim after supported disk moves and VM migrations – it doesn’t replace guest-side periodic trim, and it doesn’t mean trim runs automatically the instant any clone is created; more on verifying that directly in the failures section below. The Proxmox VE VM Templates and Clones documentation covers the full template/clone model. If clones will run tight on memory, the Proxmox RAM sizing guide covers ballooning and allocation before you standardize a memory size in the template.
Generalizing the VM before converting
This is where most Proxmox VM template mistakes happen. Which cleanup path applies depends on whether the image is manually installed or cloud-init based.
Path A – manually installed Linux VM. Remove the machine ID:
truncate -s 0 /etc/machine-id
rm -f /var/lib/dbus/machine-id
On the next boot, systemd initializes a machine ID from the available platform identity – the KVM/DMI UUID or another firmware/hypervisor value – or generates a random one when no suitable value exists. Clear it before cloning any general-purpose Linux image: some systemd-networkd and netplan configurations derive the DHCP client identifier from machine identity rather than the MAC address, which can produce duplicate leases across clones even with different MACs. Other DHCP clients key off the MAC directly, so the exact symptom is stack-dependent, but leaving machine-id populated is never the right default for a template.
Remove SSH host keys, but only once a working regeneration path is confirmed, not as a blind default:
rm -f /etc/ssh/ssh_host_*Don’t assume host keys regenerate automatically – verify it for your specific image. Behavior depends on the distribution release, the SSH package/service unit, and whether cloud-init or a first-boot script actually calls ssh-keygen -A. For a manually built template, add and test a first-boot mechanism (a systemd unit or rc.local calling ssh-keygen -A, or run dpkg-reconfigure openssh-server manually after cloning – a Debian/Ubuntu example, SSH reconfiguration commands vary by distribution) before relying on it – a clone with no host keys at all is worse than one that just warns about a shared fingerprint.
Clean up (Debian/Ubuntu example – the package-cache command varies by distribution):
history -c && history -w
apt clean
history -c only clears the current shell’s history, not full image sanitization. Before publishing a template others will clone, also check other user accounts, authorized SSH keys, cloud-init user data, temporary credentials, configuration-management tokens, installer logs, and application-specific logs.
Path B – cloud-init image or cloud-init-enabled template:
cloud-init clean --logs --machine-idThe --machine-id flag was added in cloud-init 23.1 – check the installed version before relying on it:
cloud-init --versionOn older images, run cloud-init clean --logs, then empty the machine ID manually the same way Path A does:
cloud-init clean --logs
truncate -s 0 /etc/machine-id
rm -f /var/lib/dbus/machine-id
Either version resets cloud-init’s instance state and clears its logs so per-instance modules run again on next boot. Cloud-init can also rotate SSH host keys on first boot when configured to do so; cloud images built for cloud-init commonly handle this on their own, but verify it for the image you’re using. Don’t stack Path A’s manual machine-id/SSH-key commands on top of Path B without testing the resulting boot – combining both without verification is a common source of clones that come up broken.
Do not reboot the VM after cleanup, on either path. Booting regenerates /etc/machine-id and, on images where it’s wired up, SSH host keys too – you’d have to remove them again. Shut down cleanly and convert immediately.
Readiness checklist before converting:
- QEMU guest agent installed and running inside the VM
- Machine ID cleared (Path A) or cloud-init identity reset confirmed for your cloud-init version (Path B)
- SSH host keys removed only after confirming a first-boot regeneration path, or left to cloud-init
discard=onenabled on all VM disks- SSD emulation set intentionally, not as a blind default
- Broader sanitization done: user accounts, authorized keys, credentials, and logs checked, not just shell history
- VM shut down cleanly, not rebooted after cleanup
- Build notes updated in the VM description field
Convert to a template
This is the step where a source VM actually becomes one of your Proxmox VM templates. When you run qm template, Proxmox marks the underlying volumes as template/base volumes according to the storage backend’s naming and snapshot model – commonly seen as a base-<vmid>-disk-N pattern on file-based and ZFS storage, though the exact naming varies by backend. The VM entry changes icon and can no longer be started, only cloned. This protects the golden image from accidental modification.
GUI: right-click the VM -> Convert to Template -> confirm. CLI:
qm template 9000You’ll see a log line similar to:
Renamed "vm-9000-disk-0" to "base-9000-disk-0" in volume group "pve"The exact rename pattern depends on the storage backend.
Keep a record of how you built the template – a script, or notes in the VM description field – so you can rebuild when needed. Use a high VMID range (9000-9099) to visually separate templates from production VMs, and name them with OS and date: ubuntu2404-base-2026-04. For clusters, a linked clone can only run where its base volume is actually accessible, so a template on node-local storage constrains where its linked clones can live; full clones can be copied to another supported target storage, they just take longer. Place templates on storage chosen for the clone mechanism you need, node visibility, capacity, performance, and backup policy – shared template storage simplifies cross-node provisioning, while local template storage can be faster or cheaper but constrains where linked clones can run.
Cloning and converting a template back to a VM
Proxmox has no direct “convert template back to a VM” operation. The supported workflow is a full clone from the template, used as the editable VM:
qm clone <TEMPLATE-VMID> <NEW-VMID> --full 1 --name <NEW-NAME>
qm start <NEW-VMID>
The configuration does expose a template flag, and unsupported manual methods circulate in forums, but template disks may remain marked as base images, and toggling the flag alone doesn’t reliably produce a VM that starts correctly – don’t rely on it. This clone-from-template command is also step one of the template lifecycle workflow covered later in this guide.
Retiring a template that has linked clones
On qcow2 and normal ZFS workflows, don’t delete the template while linked clones still reference its base or origin – Proxmox blocks it with an error. LVM-thin is different: the child can remain usable after the template volume is removed, because referenced blocks stay allocated while still in use. Even there, verify the exact storage relationship and keep a backup before treating template deletion as a supported lifecycle shortcut.
base volume 'local-zfs:base-9000-disk-0' is still in use by linked clonedTwo safe general options once linked clones exist:
Option 1: retire the linked clones first, then delete the template.
Option 2: make each required VM independent through a full clone, a supported disk move, or backup/restore, then cut over.
Do not full-clone the original template when the goal is to preserve a linked clone’s current state. That recreates the original golden image and discards every change made inside the linked clone – installed packages, application data, configuration, local databases, user files, identity changes, all of it. Full-clone the linked clone itself.
For the cleanest cutover, shut down the linked VM before creating the full clone:
qm shutdown <LINKED-VMID>
qm status <LINKED-VMID>   # confirm it reports "stopped" before cloning

qm clone <LINKED-VMID> <NEW-VMID> \
    --full 1 \
    --name <NEW-NAME> \
    --storage <TARGET-STORAGE>
If downtime isn’t possible, confirm the QEMU guest agent is running and that the workload can tolerate snapshot-style or filesystem-consistent cloning before cloning it live – a live clone isn’t automatically application-consistent for databases and other transactional services. On some backends, moving the linked clone’s disk to another storage can also create an independent copy while retaining the same VMID; treat this as storage-specific and verify the resulting disk no longer references the original base before deleting the template. Other supported paths depending on storage and downtime requirements: back up and restore to a new VMID, or use backend-specific flattening only when Proxmox itself supports and documents it for your version.
Because a full-clone-and-cutover produces a new VM rather than converting the old one in place, plan around it: verify the new VM’s MAC and IP configuration, update backup jobs and HA resources pointing at the old VMID, update monitoring and automation references, and stop the old linked-clone VM before starting its replacement if their identities would otherwise overlap.
Before deleting a template, check which VMs still reference it. On backends that expose it, the storage content view’s parent field can show an explicit base relationship:
pvesh get /nodes/<NODE>/storage/<STORAGE-ID>/contentNo single check is authoritative across qcow2, ZFS, LVM-thin, BTRFS, and RBD – use the storage content view, qm config on all relevant VMs, and backend-native inspection together. A broader grep is a convenience check only, for explicit base-name references, and it can miss LVM-thin block-level relationships and backend-native RBD or ZFS references that don’t appear as that literal filename string:
grep -R 'base-9000-disk' /etc/pve/nodes/*/qemu-server/Clone verification checklist
Every VM cloned from a Proxmox VM template should pass these checks before going into service. A clone’s virtual hardware identity (new MAC, new VMID) is a separate layer from its guest-level identity – machine-id, hostname, SSH host keys, and any cloud-init instance data all need their own verification regardless of what Proxmox generated automatically:
# From inside the clone
cat /etc/machine-id                            # must differ from other clones
ssh-keygen -lf /etc/ssh/ssh_host_ed25519_key.pub   # unique fingerprint
hostname                                       # correct hostname
ip addr show                                   # correct IP, no conflict

# From the host
qm agent <vmid> ping                          # guest agent responding
Run these on every clone before it goes into production. Most issues get caught here rather than after something breaks in service.
Template lifecycle and versioning
Treat a Proxmox VM template as immutable once converted – the supported update path is a new template, not an edit to the existing one. Full-clone it, patch the clone, boot-test it, re-clean, and only then convert the clone to a new VMID:
qm clone 9000 9001 --name ubuntu2404-base-patch --full true
qm start 9001
Inside 9001, apply updates and reboot as needed – the “don’t reboot” rule only applies after final identity cleanup, not during patching:
apt update && apt upgrade -y
reboot
Verify the updated VM boots cleanly and its services are healthy before capturing it – a template built without boot-testing the new kernel, initramfs, systemd, networking, cloud-init, or guest-agent updates can silently ship a broken base. See the Proxmox update guide if the host itself also needs updating before you rebuild the template. Once the boot test passes, repeat whichever generalization path matches this template (Path A or Path B above), then shut down without rebooting again:
qm shutdown 9001
qm template 9001
Test a clone from the new template before retiring the old one – a broken update is much cheaper to catch here than after production clones depend on it. Keep the old template around while rollback is still plausible. Before deleting it, confirm which VMs still reference it (see the dependency check above), and update any automation or documentation that still points at the old VMID. Name templates with OS, date, and revision (ubuntu2404-base-2026-06), store build notes in the VM description field, and retire old VMIDs once all dependent clones are cleared. If manual rebuilds start happening often enough to feel repetitive, that’s usually the point where Packer or Terraform starts paying for itself.
Common failures and how to verify them
1. Duplicate IPs after cloning
Symptom: two cloned VMs end up with the same IP despite different MACs – see Path A above for why. Fix on already-cloned VMs:
rm /etc/machine-id
systemd-machine-id-setup
reboot
Netplan workaround if rebuilding isn’t possible – add under the interface in /etc/netplan/<config>.yaml:
dhcp4: true
dhcp-identifier: mac
2. Thin-provisioning bloat after cloning or migration
Symptom: a thin-provisioned disk shows more space used after a clone or migration than the guest actually has written. Physical allocation depends on the source format, target backend, preallocation settings, discard history, and the migration path – measure the resulting volume instead of assuming logical thin provisioning guarantees a particular physical allocation:
lvs -o name,size,data_percent   # LVM-thin
zfs list                        # ZFS
Run fstrim inside the VM directly as a controlled check after cloning or migrating:
fstrim -av

# Or via guest agent from the host:
qm guest exec <vmid> -- fstrim -av
Then confirm the guest’s periodic trim timer is actually enabled, rather than relying on someone remembering to trim manually after every clone:
systemctl status fstrim.timer
systemctl list-timers fstrim.timer
3. Missing QEMU guest agent
Symptom: no IP shown in the Proxmox GUI, no guest filesystem freeze/thaw during backups, fstrim doesn’t run automatically after a disk move or migration.
# From the host
qm agent <vmid> ping
# Should complete without an agent communication error

qm config <vmid> | grep '^agent:'
# Should show something like: agent: enabled=1,fstrim_cloned_disks=1

# Inside the VM
systemctl status qemu-guest-agent
Without a working guest agent, Proxmox can’t use guest filesystem freeze/thaw for snapshot-mode backup coordination – the result may be only crash-consistent unless the workload uses another application-consistency mechanism (application-native backup tooling, hooks, or stopping the guest first). Common causes of a non-responding agent: agent not installed in the template, VM not cold-booted after enabling it (the virtio-serial channel is a hardware change – requires a full stop and start, not a reboot), or on Windows, VirtIO drivers or the qemu-ga MSI not installed. If a clone fails to boot at all rather than just missing the agent, that’s a different problem – see the Proxmox VM won’t start guide.
4. SSH host key duplication
Symptom: SSH client warns about a conflicting host key when connecting to a cloned VM – or, if keys were removed without a regeneration path, no host key is presented at all and the connection fails differently. Where there’s no reliable first-boot mechanism, run this manually inside each clone after cloning (Debian/Ubuntu example):
dpkg-reconfigure openssh-server
# or, on other distributions:
ssh-keygen -A
Verify per clone:
ssh-keygen -lf /etc/ssh/ssh_host_ed25519_key.pub
# Must produce a different fingerprint on each clone
FAQ
What is a Proxmox VM template?
A read-only base VM that can only be cloned, not started – Proxmox marks its volumes as template/base volumes and changes its icon once converted. A clone is a new VM derived from a template (or another VM); full clones are independent copies, linked clones share the template’s base disk via copy-on-write.
How do I create a Proxmox VM template?
Build or import a clean Linux image, install and verify the QEMU guest agent, generalize its identity (Path A or Path B above), shut down without rebooting, then run qm template <VMID> or use Convert to Template in the GUI.
Linked clone or full clone – which should I use?
Full clone when the VM must survive template deletion, needs cross-storage portability, or will diverge significantly from the base. Linked clone when rapid provisioning and space efficiency matter more than independence and the base template’s lifecycle is centrally managed. The dependency and deletion behavior differ by storage backend, so check which one you’re on before deciding.
Which storage backends support linked clones?
Directory and NFS with the qcow2 image format, plus LVM-thin, ZFS, BTRFS, and Ceph RBD natively – but the underlying mechanism and template-deletion behavior differ by backend, see the storage-backend matrix above. Plain thick LVM has no storage snapshots or linked clones, only full clones by copying the complete disk. Plain iSCSI LUNs have no native linked clone; it depends on the supported storage layer above the LUN.
Can I convert a template back to a VM?
Not directly – there’s no supported one-step conversion. Create a full clone from the template and use that as your editable VM: qm clone <TEMPLATE-VMID> <NEW-VMID> --full 1. Manually toggling the template flag is not a supported workflow and can leave you with a VM that won’t start correctly.
How do I detach a linked clone without losing its changes?
Full-clone the linked clone itself, not the original template – cloning the template instead recreates the clean golden image and discards everything the linked clone accumulated. Shut the linked VM down first for the cleanest result; on some backends, moving its disk to another storage can also detach it while keeping the same VMID.
Why do cloned Linux VMs get duplicate IPs or identities?
On some systemd-networkd and netplan configurations, the DHCP client identifier is derived from /etc/machine-id rather than the MAC, so identical machine-ids can produce identical leases. Clear /etc/machine-id in the template before converting. On existing clones: rm /etc/machine-id && systemd-machine-id-setup && reboot.
Final thoughts
Proxmox VM templates are one of the habits that pays back the most in a Proxmox environment: once the base image is clean – machine-id cleared, SSH key regeneration verified, agent installed, discard configured – every subsequent deploy is fast and consistent, and the two decisions that matter most are which clone type fits the workload and which storage backend you’re on, since together they determine both the independence you get and how template deletion actually behaves. For storage architecture decisions, see Proxmox Storage: ZFS vs LVM-thin vs Ceph.
Proxmox VE Series
28 articles – Installation · Storage · Networking · HA · Recovery